> ## Documentation Index
> Fetch the complete documentation index at: https://loops.so/docs/llms.txt
> Use this file to discover all available pages before exploring further.
# Supabase SMTP
> Configure your Supabase account to send authentication emails with Loops.
If you are looking to sync Supabase user data to Loops, you can use our
[Supabase integration](/integrations/supabase).
Set up an SMTP connection to send all of your Supabase emails with Loops.
There are two big benefits to using Loops for sending your Supabase emails:
You can use [Loops' design editor](/creating-emails/editor) to create (and
then easily edit) beautiful transactional emails instead of having to code
them with HTML.
You get full visibility on which emails are being sent, when, and to whom in
your Loops account. Supabase doesn't offer this view.
## Set up Loops SMTP in Supabase
You can set up Loops SMTP in Supabase with just a few clicks.
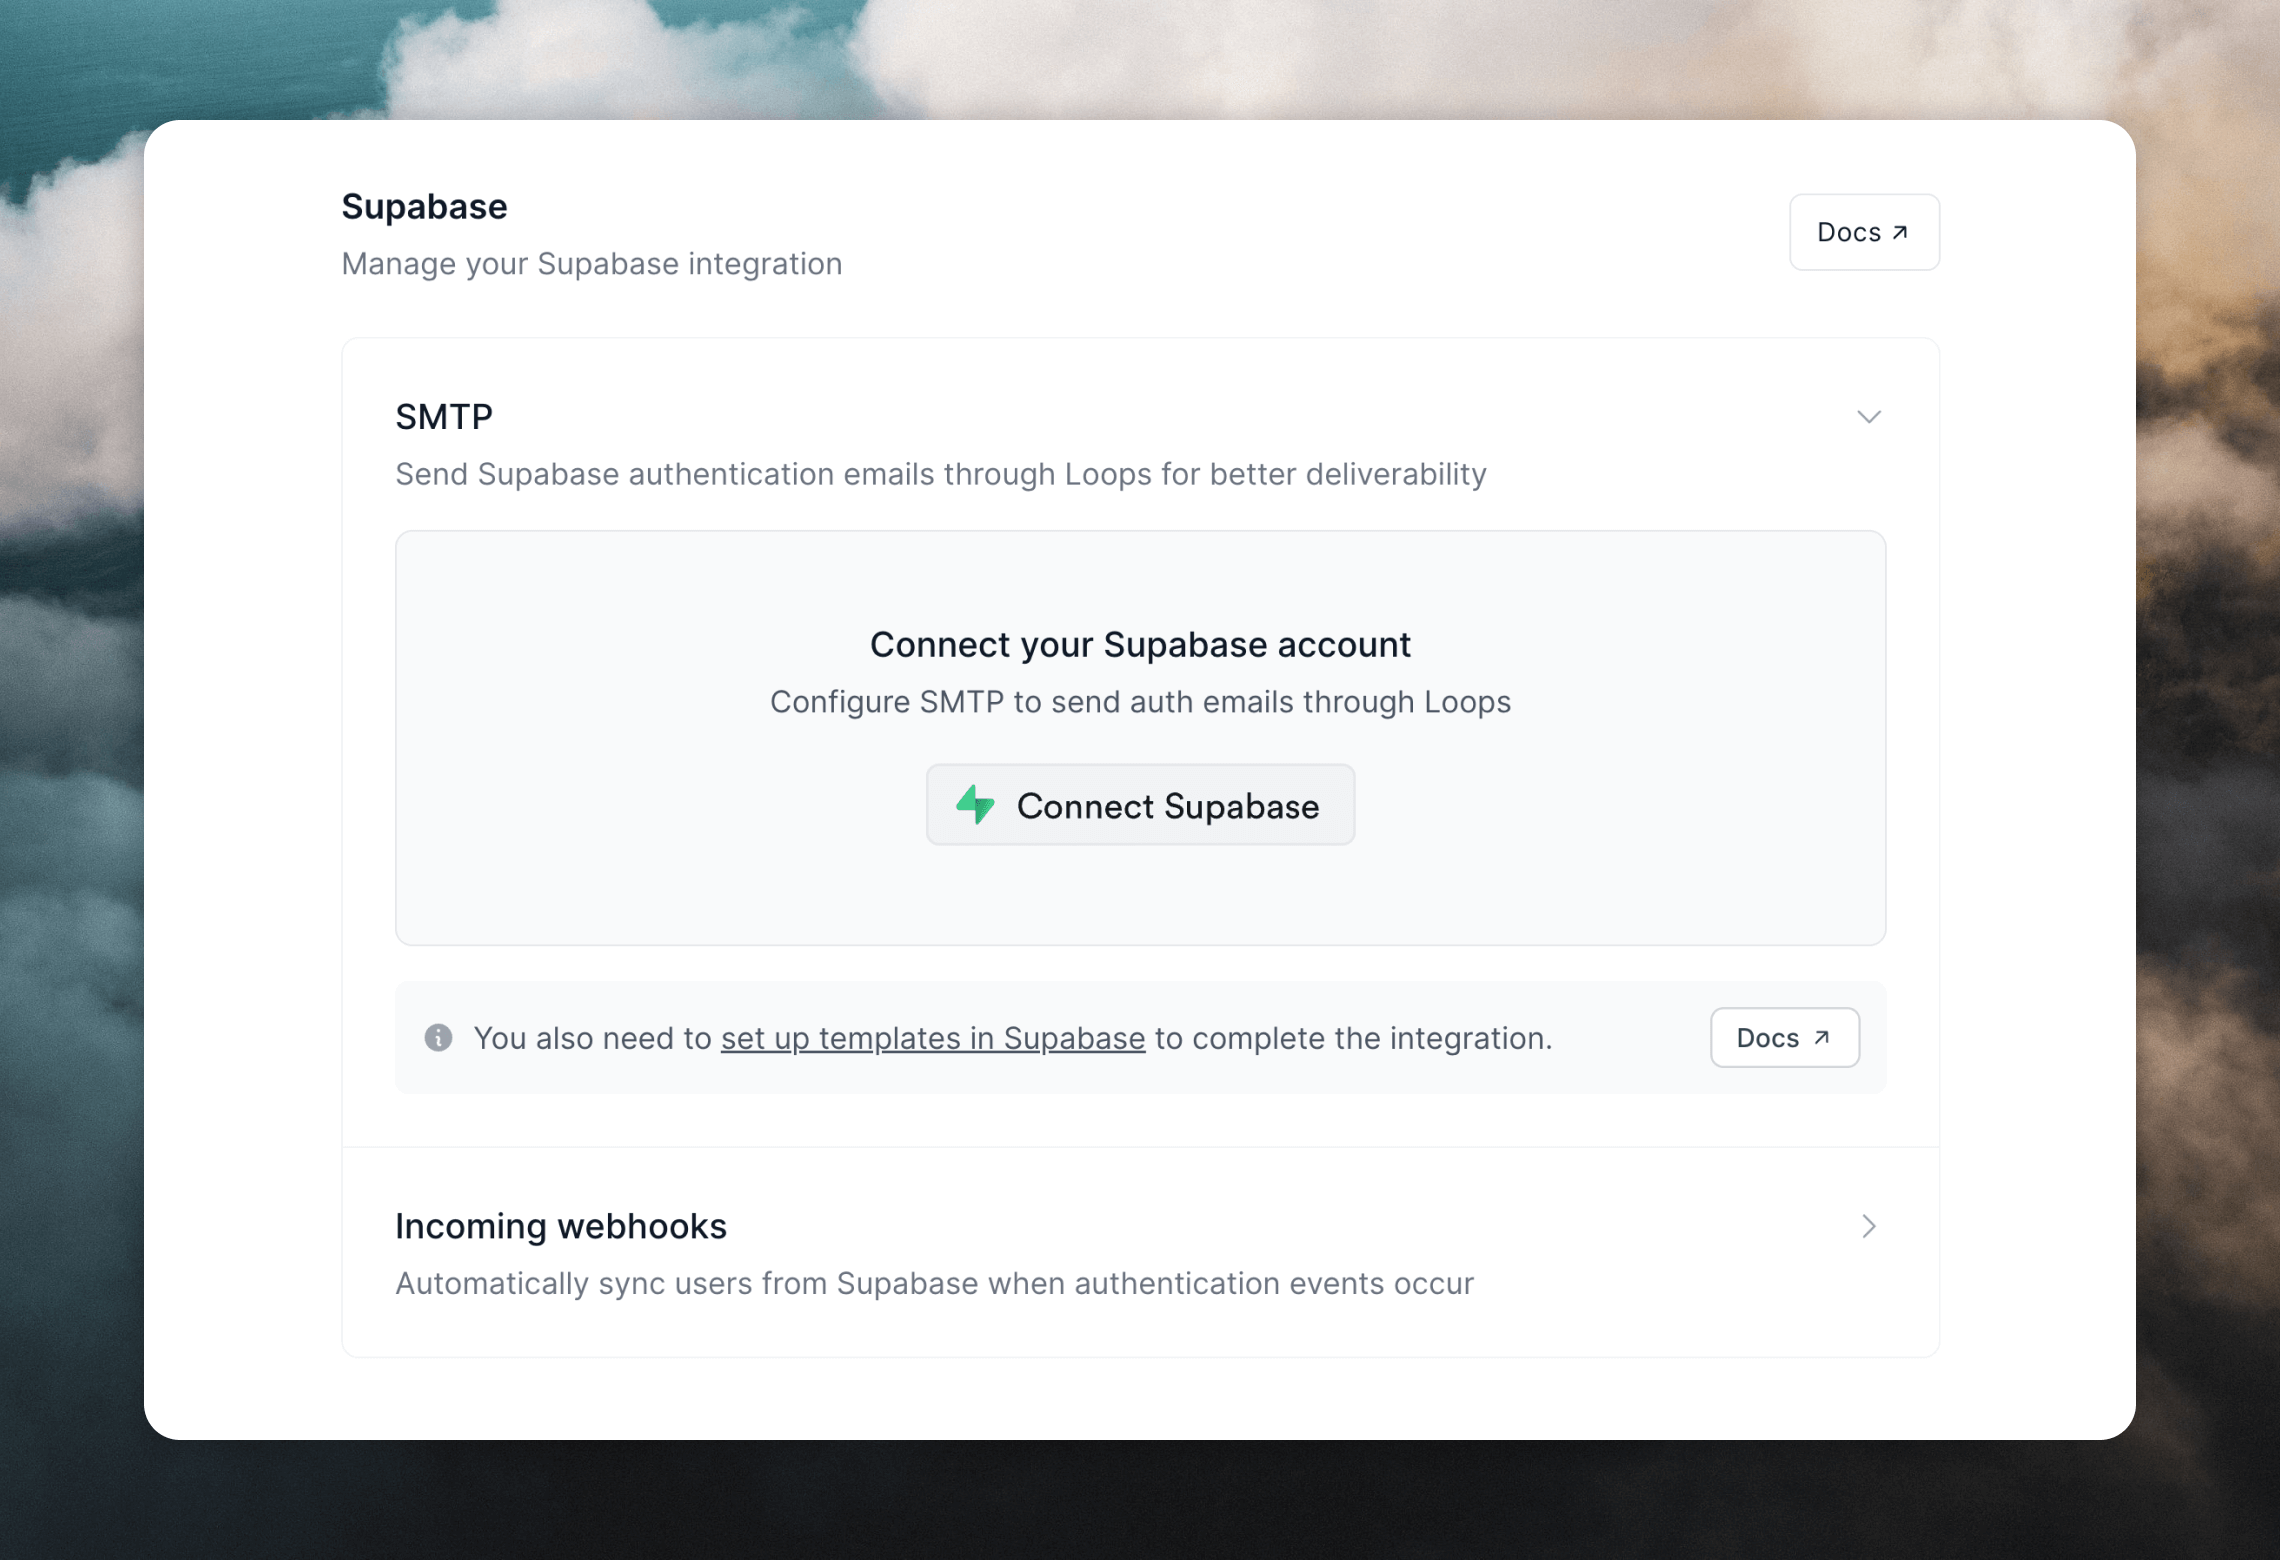
Go to [Settings -> Supabase](https://app.loops.so/settings?page=supabase) and click **Connect Supabase** in the **SMTP** section.
 When prompted by Supabase, select your organization and authorize access.
Back in Loops, select your Supabase project and an API key (which is used as the SMTP password), then click **Set up SMTP**.
This will add Loops SMTP credentials to your Supabase project, so you can start sending emails. You can find these credentials in Supabase at [Authentication -> Emails -> SMTP Settings](https://supabase.com/dashboard/project/_/auth/smtp).
For reference, the SMTP credentials are:
| Field | Value |
| :---------- | :----------------------------------------------------------------------------------- |
| Host | `smtp.loops.so` |
| Port number | `587` |
| Username | `loops` |
| Password | An API key from your [API settings](https://app.loops.so/settings?page=api) in Loops |
## Create Transactional emails in Loops
Next, create new transactional emails for the emails listed in Supabase ([Authentication -> Emails](https://supabase.com/dashboard/project/_/auth/templates)). You need to create both **Confirm signup** and **Magic Link** emails to be able to properly set up the integration.
* Confirm signup (required)
* Invite user
* Magic Link (required)
* Change Email Address
* Reset Password
Note that if a Supabase user has not previously confirmed their email, they will be sent a **Confirm signup** email when you request a **Magic Link** email.
To create new transactional emails, go to the [Transactional page](https://app.loops.so/transactional) in Loops and click **New**. Alternatively, you can select one of our many ready-made templates from the [Templates page](https://app.loops.so/templates).
When prompted by Supabase, select your organization and authorize access.
Back in Loops, select your Supabase project and an API key (which is used as the SMTP password), then click **Set up SMTP**.
This will add Loops SMTP credentials to your Supabase project, so you can start sending emails. You can find these credentials in Supabase at [Authentication -> Emails -> SMTP Settings](https://supabase.com/dashboard/project/_/auth/smtp).
For reference, the SMTP credentials are:
| Field | Value |
| :---------- | :----------------------------------------------------------------------------------- |
| Host | `smtp.loops.so` |
| Port number | `587` |
| Username | `loops` |
| Password | An API key from your [API settings](https://app.loops.so/settings?page=api) in Loops |
## Create Transactional emails in Loops
Next, create new transactional emails for the emails listed in Supabase ([Authentication -> Emails](https://supabase.com/dashboard/project/_/auth/templates)). You need to create both **Confirm signup** and **Magic Link** emails to be able to properly set up the integration.
* Confirm signup (required)
* Invite user
* Magic Link (required)
* Change Email Address
* Reset Password
Note that if a Supabase user has not previously confirmed their email, they will be sent a **Confirm signup** email when you request a **Magic Link** email.
To create new transactional emails, go to the [Transactional page](https://app.loops.so/transactional) in Loops and click **New**. Alternatively, you can select one of our many ready-made templates from the [Templates page](https://app.loops.so/templates).
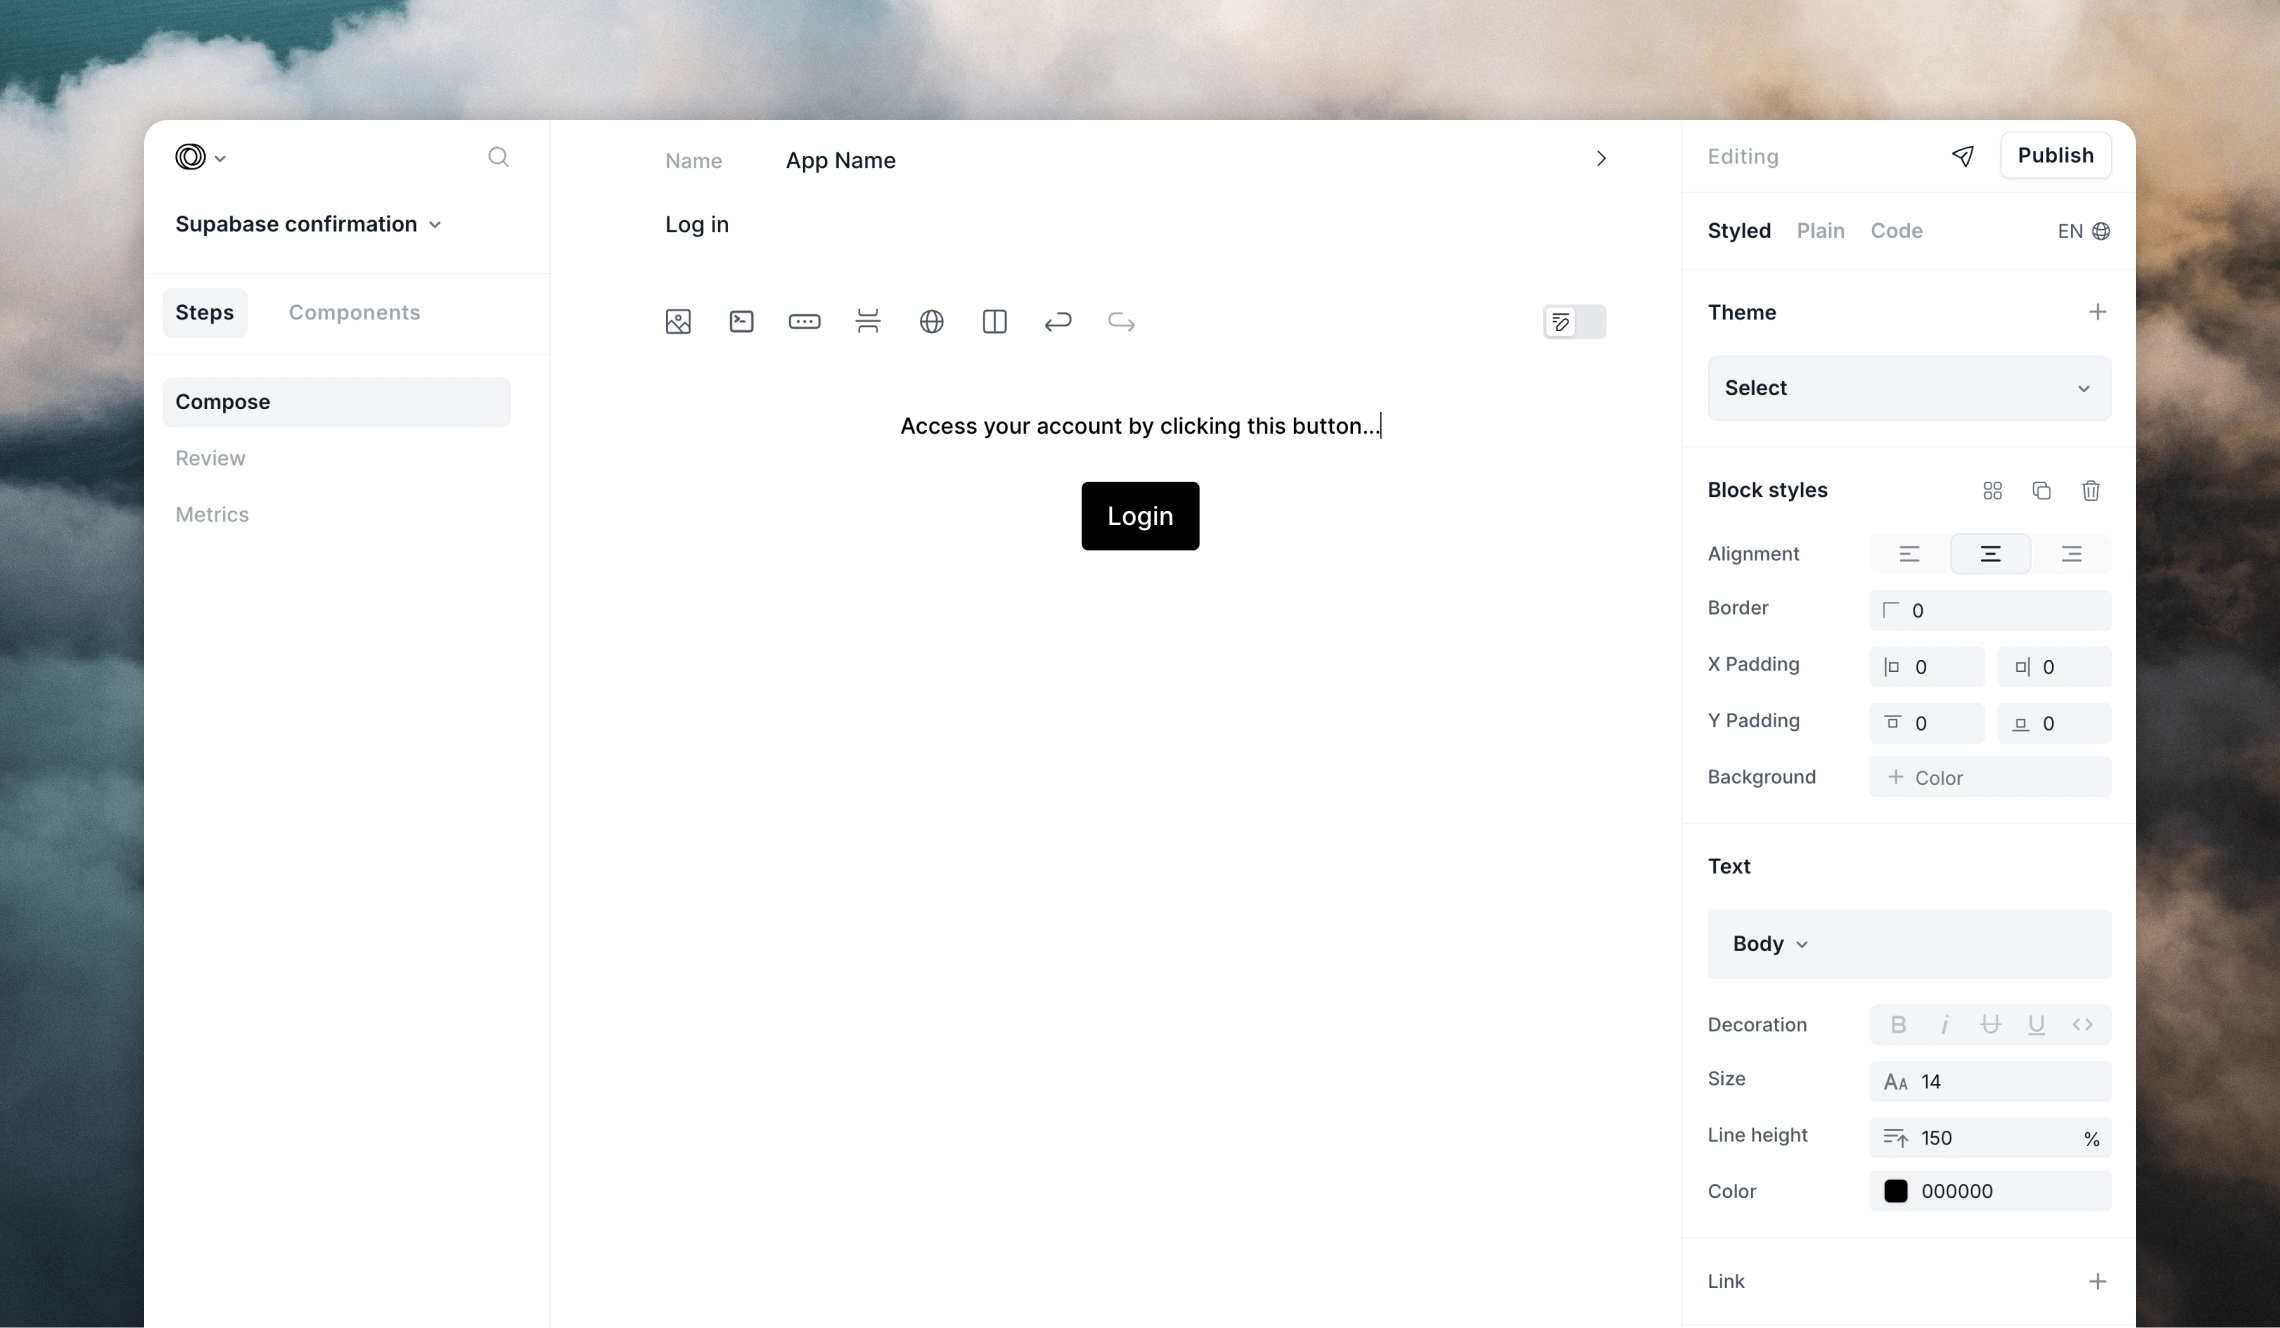 You can then use [the Loops editor](/creating-emails/editor) to create nicely-designed templates or make them as simple as you like.
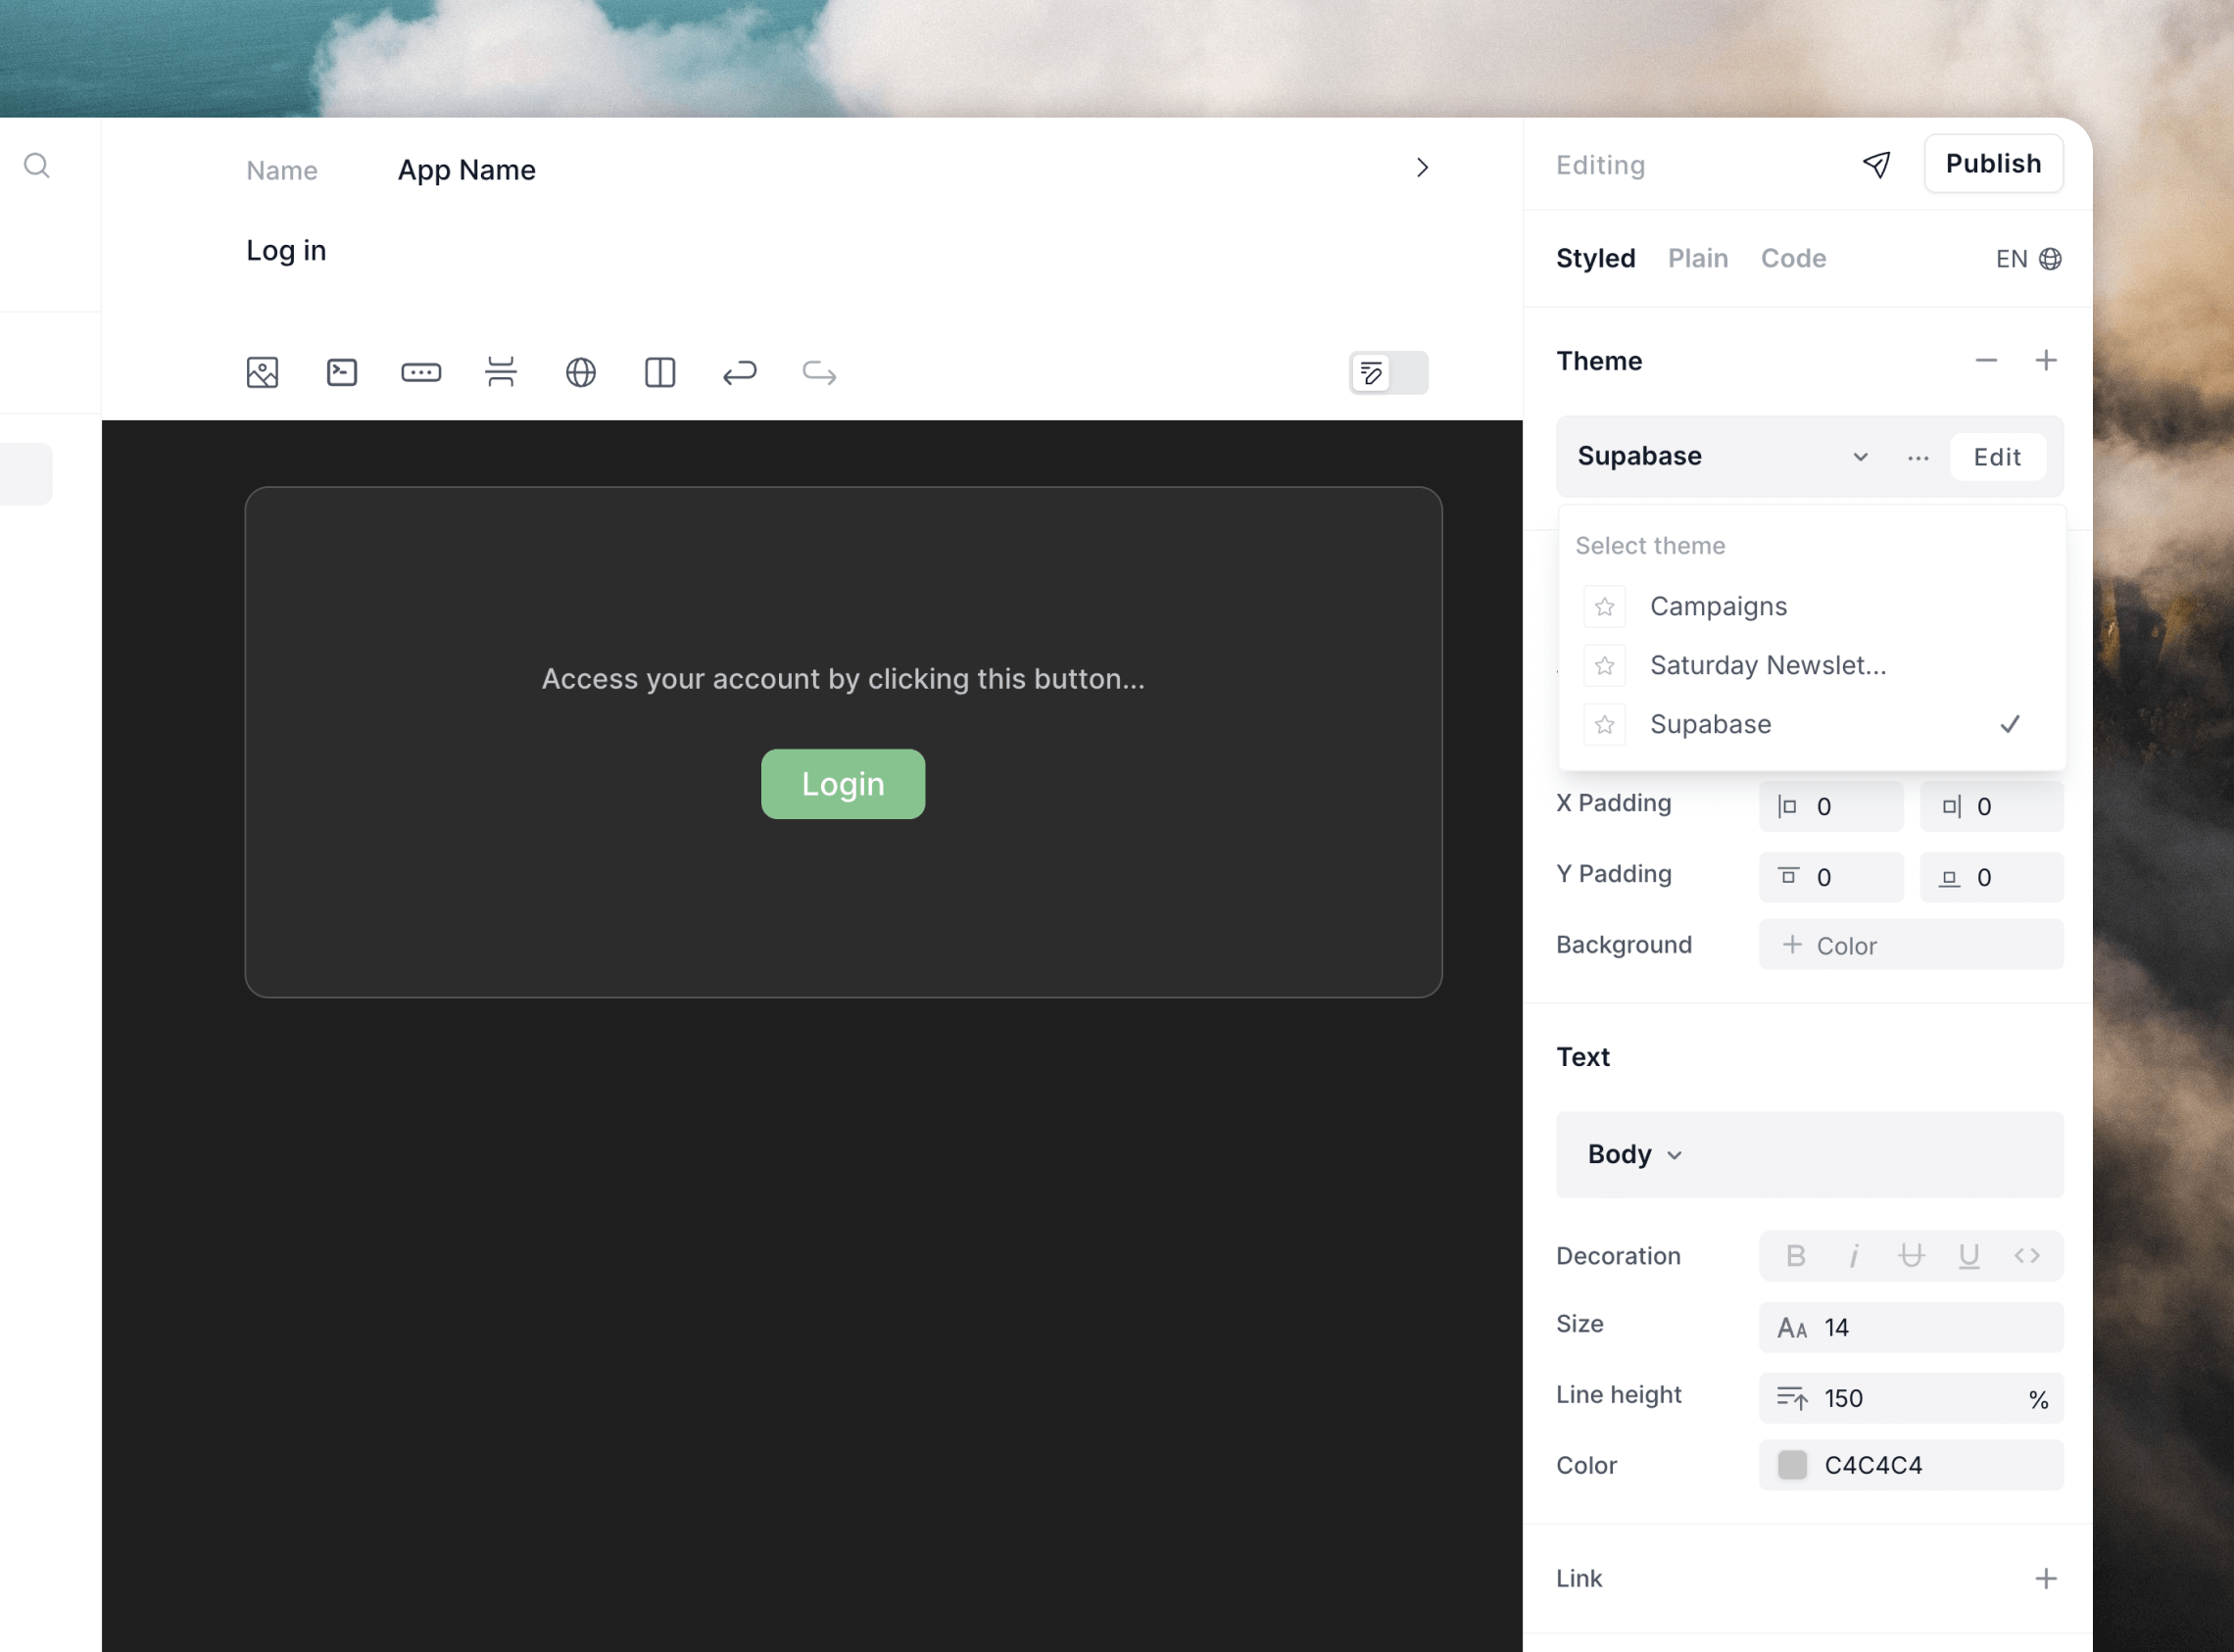
You can even create [themes](/creating-emails/styles#themes) to apply consistent design and branding to all of your emails.
You can then use [the Loops editor](/creating-emails/editor) to create nicely-designed templates or make them as simple as you like.
You can even create [themes](/creating-emails/styles#themes) to apply consistent design and branding to all of your emails.
 For each Loops template you create, you need to [add data variables](/creating-emails/personalizing-emails#add-dynamic-content-to-emails), which allow data from Supabase to be inserted into each email.
For example, you could add a `confirmationUrl` data variable that you can map to the `{{ .ConfirmationURL }}` value from Supabase.
You can also build URLs by including values like `{{ .SiteUrl }}` or add in a confirmation code using `{{ .Token }}`.
For each Loops template you create, you need to [add data variables](/creating-emails/personalizing-emails#add-dynamic-content-to-emails), which allow data from Supabase to be inserted into each email.
For example, you could add a `confirmationUrl` data variable that you can map to the `{{ .ConfirmationURL }}` value from Supabase.
You can also build URLs by including values like `{{ .SiteUrl }}` or add in a confirmation code using `{{ .Token }}`.
 Once you're done creating the email and adding data variables, click **Review** in the left panel. Here you can see the API payload for your template. You will need this for the next step.
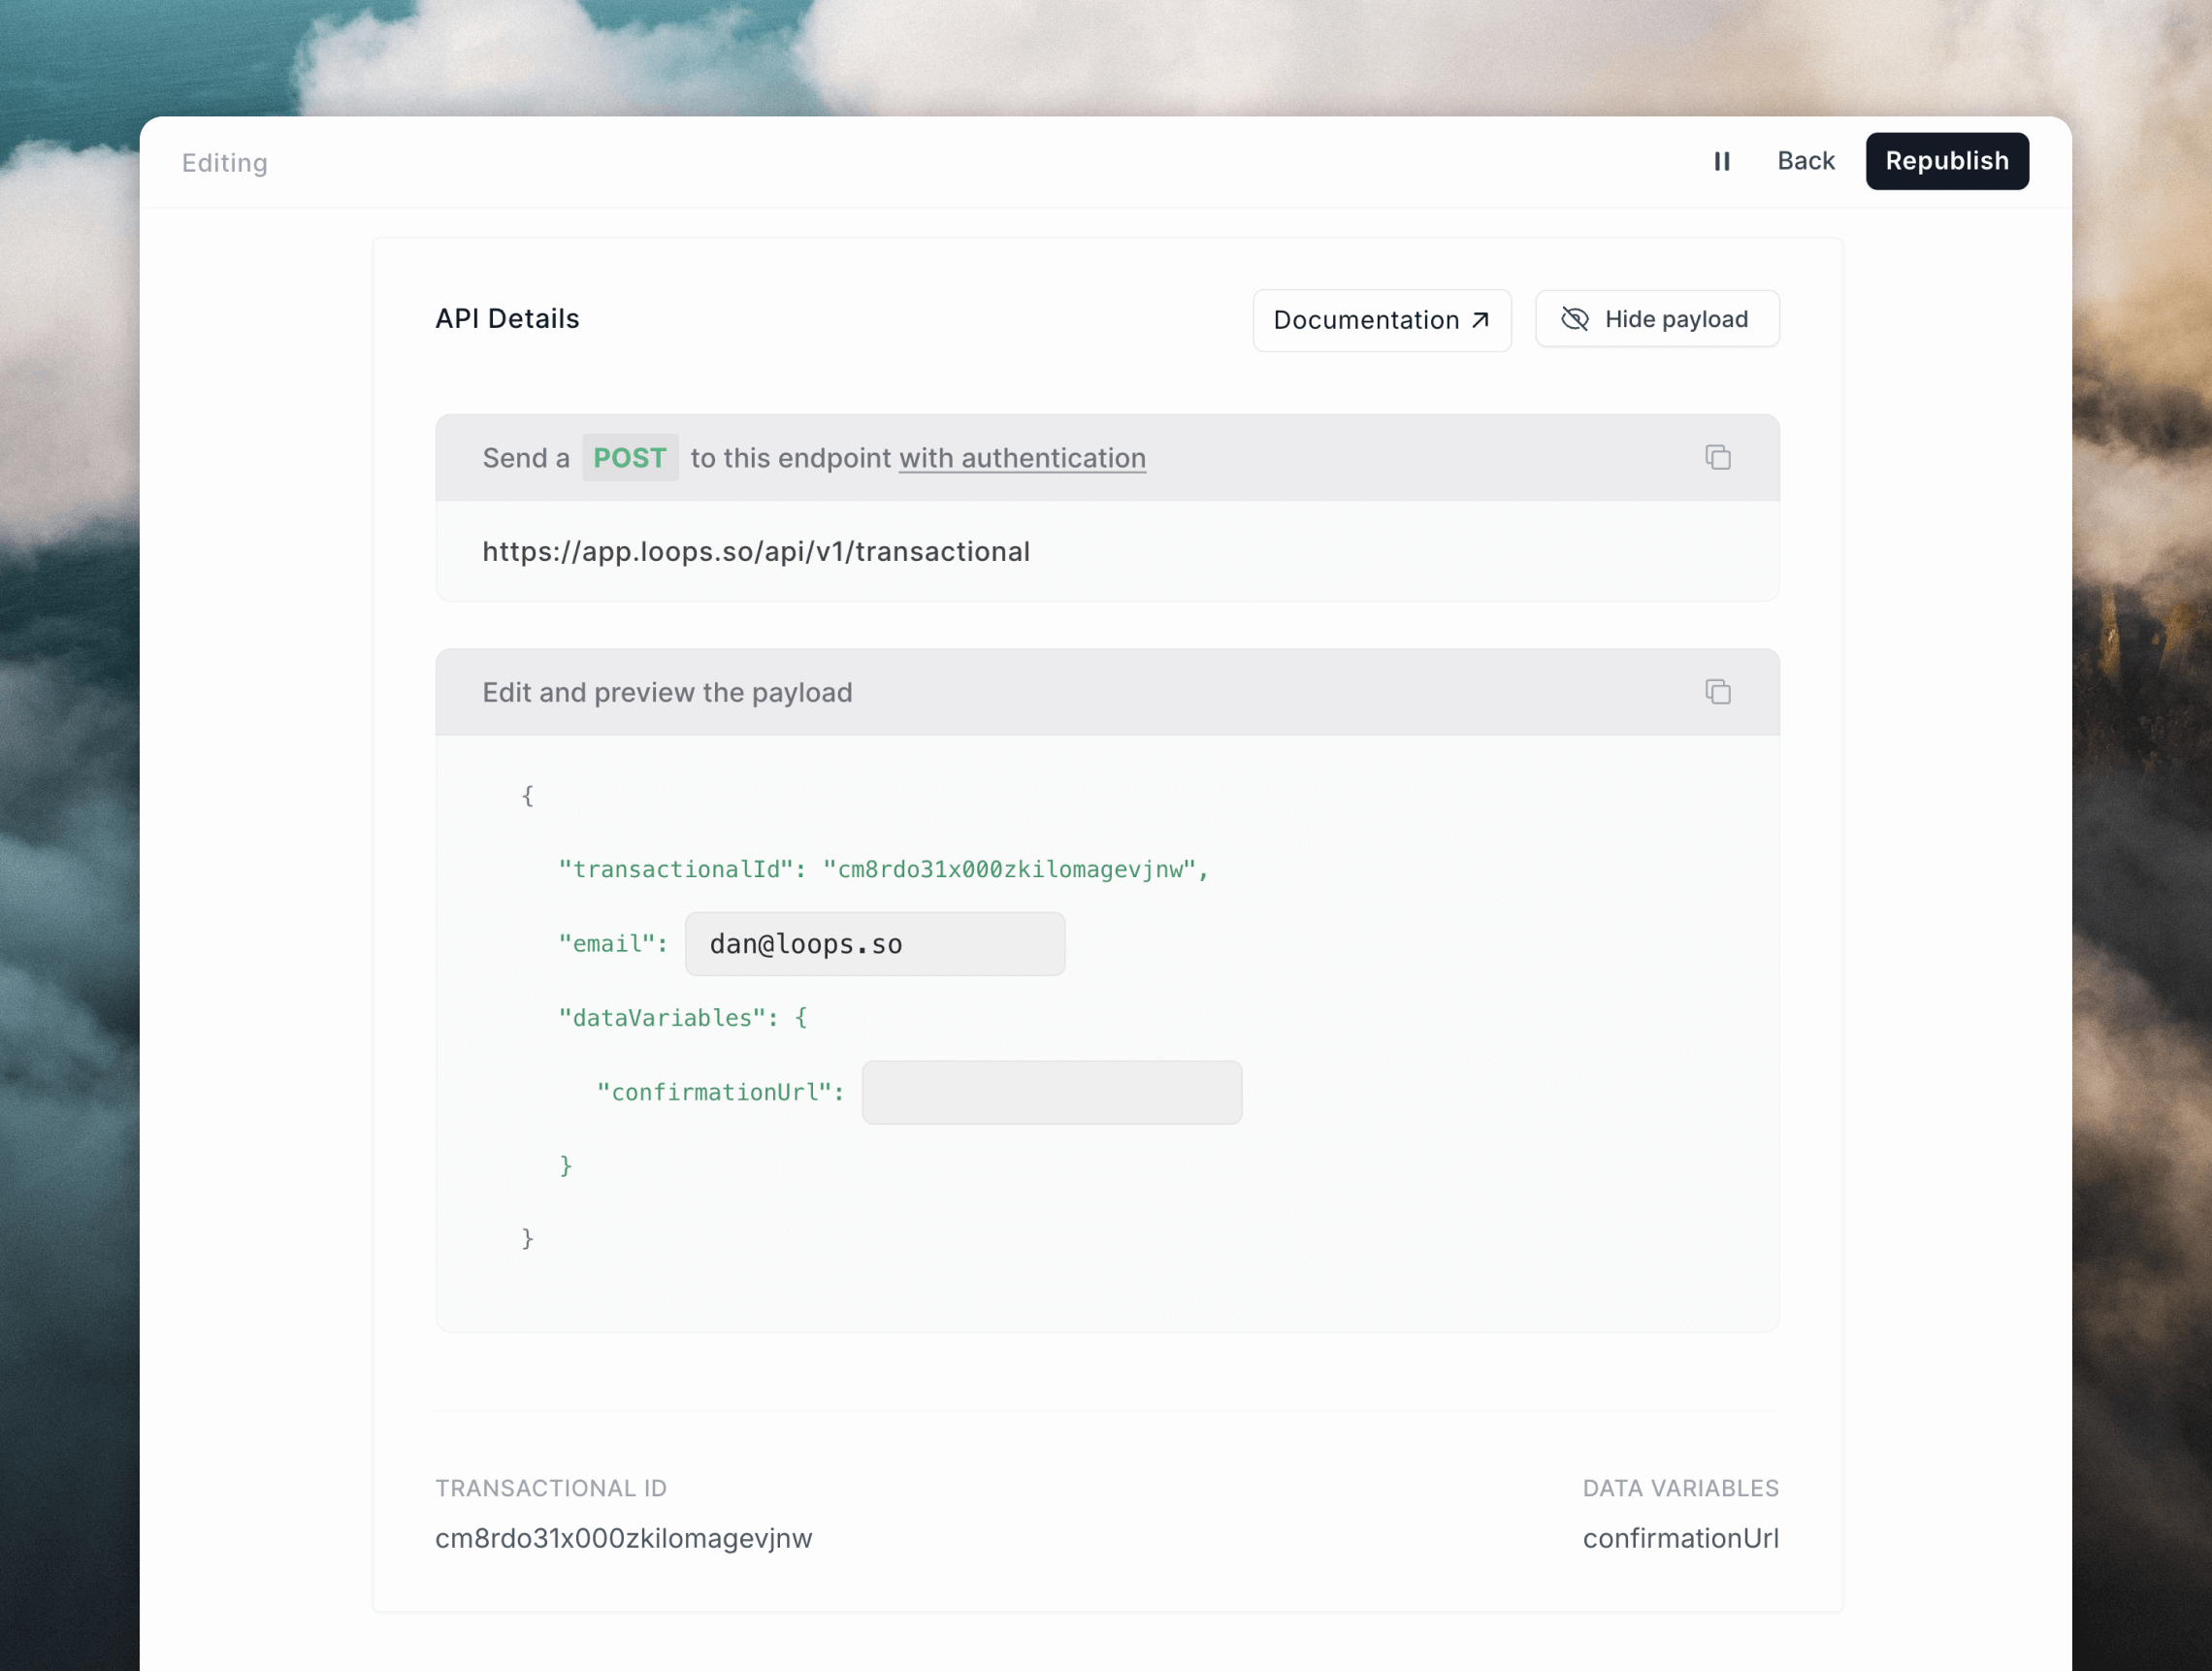 Make sure to also publish your email! It won't send unless it's published.
Read our detailed guide for sending transactional emails.
## Configure email templates in Supabase
The final step is to make sure your emails in Supabase are configured to send the correct data to Loops.
Loops SMTP integrations work a bit differently than most. Instead of sending a text or HTML email body, you set them up to send API-like data.
In Supabase, go to [Authentication -> Emails](https://supabase.com/dashboard/project/_/auth/templates), then edit each template to contain the payload as shown in the previous step (you can click the clipboard icon in Loops to copy the full payload).
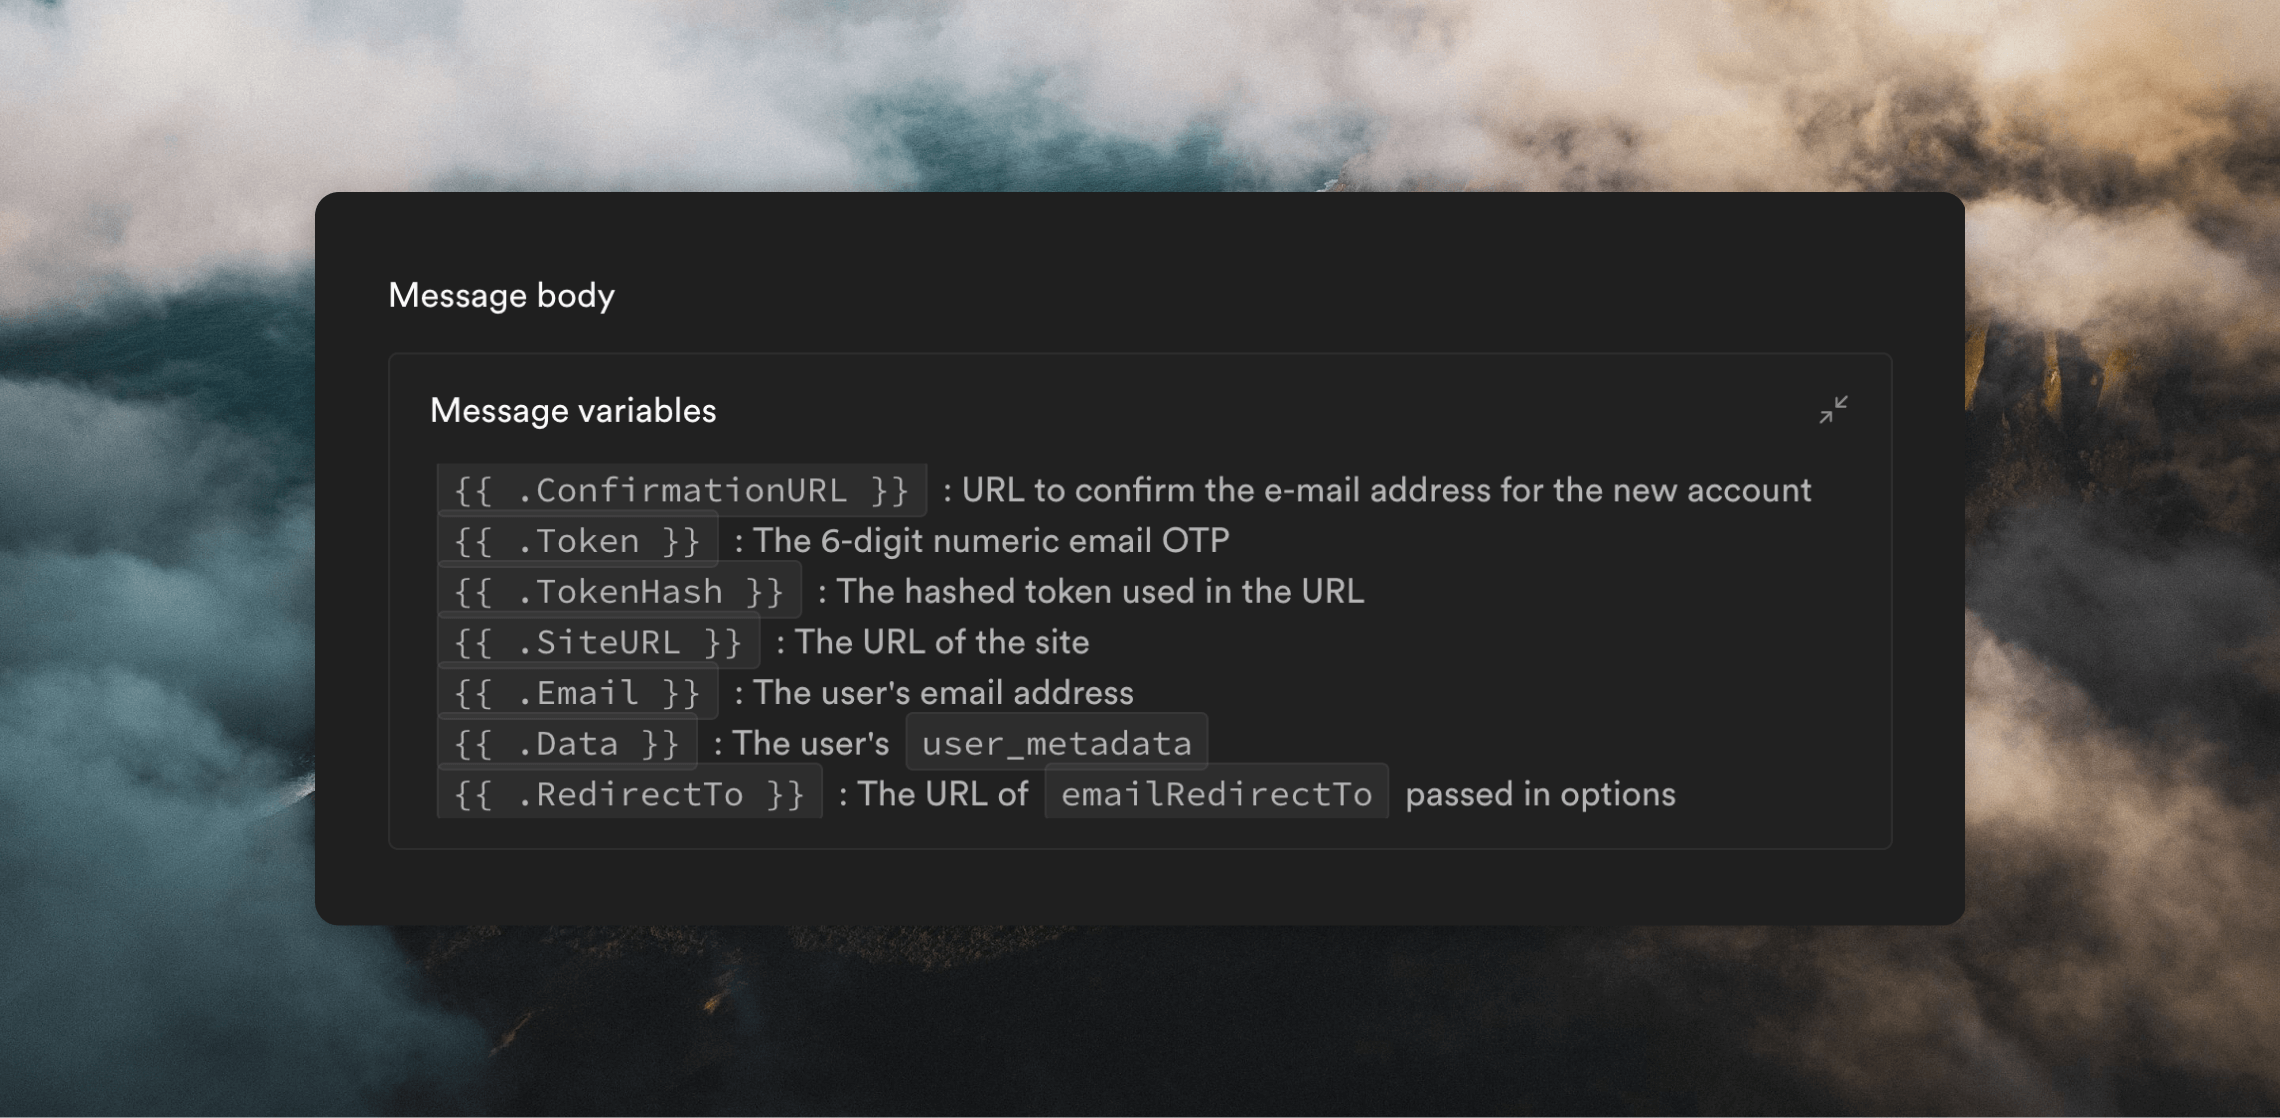
Once pasted into the Message body, you need to add the Supabase message variables into the payload.
Make sure you set up at least the **Confirm signup** and **Magic Link**
templates in Supabase, otherwise emails will not be sent. Also, any variables
added in the **Confirm signup** template need to also be available in **Magic
link** email, because Supabase will send a **Confirm signup** email instead of
a **Magic Link** email if a user hasn't confirmed their email address.
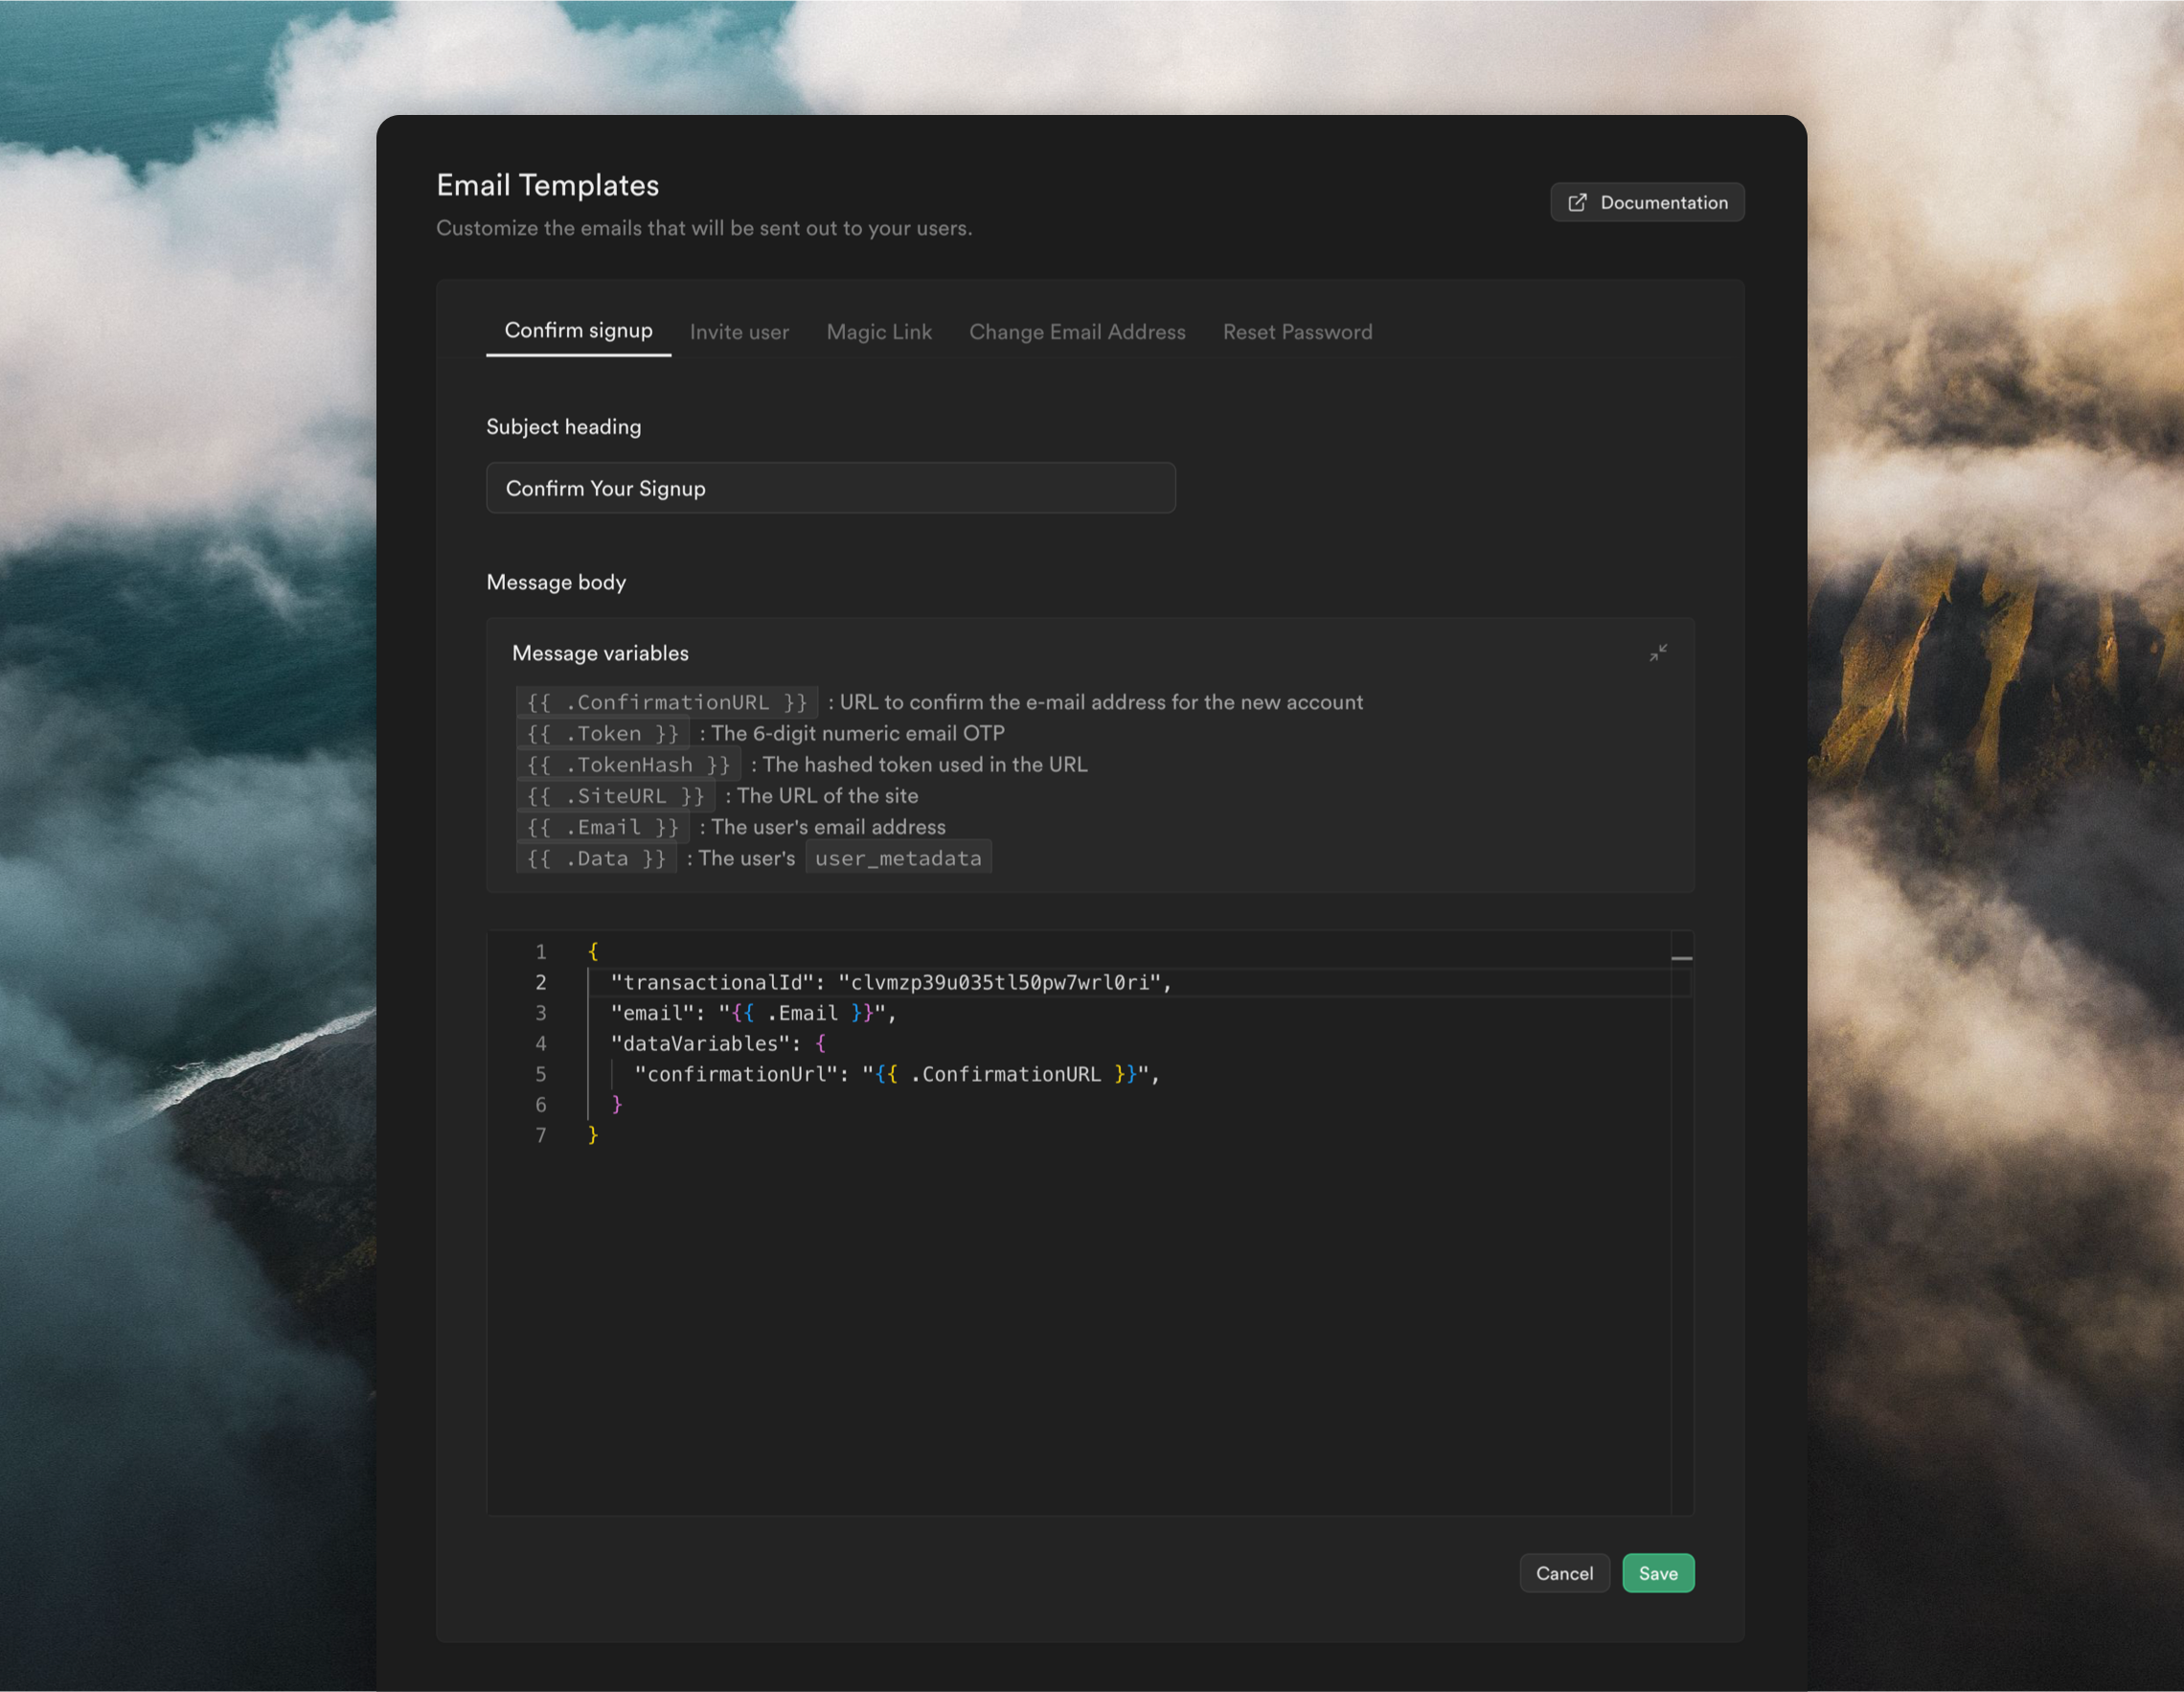
Here is an example **Confirm signup** email template. This payload was copied from the template's Publish page in Loops, then the `{{ .Email }}` and `{{ .ConfirmationURL }}` Supabase variables were added.
```json theme={"dark"}
{
"transactionalId": "clvmzp39u035tl50pw7wrl0ri",
"email": "{{ .Email }}",
"dataVariables": {
"confirmationUrl": "{{ .ConfirmationURL }}"
}
}
```
If you want to add each Supabase user to your Loops audience so you can send marketing email to them, add the `addToAudience` flag to your template as below. This will create a contact in Loops using the `{{ .Email }}` value.
```json theme={"dark"}
{
"transactionalId": "clvmzp39u035tl50pw7wrl0ri",
"email": "{{ .Email }}",
"addToAudience": true,
"dataVariables": {
"confirmationUrl": "{{ .ConfirmationURL }}"
}
}
```
Here's how the template looks in the Supabase editor:
Make sure to also publish your email! It won't send unless it's published.
Read our detailed guide for sending transactional emails.
## Configure email templates in Supabase
The final step is to make sure your emails in Supabase are configured to send the correct data to Loops.
Loops SMTP integrations work a bit differently than most. Instead of sending a text or HTML email body, you set them up to send API-like data.
In Supabase, go to [Authentication -> Emails](https://supabase.com/dashboard/project/_/auth/templates), then edit each template to contain the payload as shown in the previous step (you can click the clipboard icon in Loops to copy the full payload).
Once pasted into the Message body, you need to add the Supabase message variables into the payload.
Make sure you set up at least the **Confirm signup** and **Magic Link**
templates in Supabase, otherwise emails will not be sent. Also, any variables
added in the **Confirm signup** template need to also be available in **Magic
link** email, because Supabase will send a **Confirm signup** email instead of
a **Magic Link** email if a user hasn't confirmed their email address.
Here is an example **Confirm signup** email template. This payload was copied from the template's Publish page in Loops, then the `{{ .Email }}` and `{{ .ConfirmationURL }}` Supabase variables were added.
```json theme={"dark"}
{
"transactionalId": "clvmzp39u035tl50pw7wrl0ri",
"email": "{{ .Email }}",
"dataVariables": {
"confirmationUrl": "{{ .ConfirmationURL }}"
}
}
```
If you want to add each Supabase user to your Loops audience so you can send marketing email to them, add the `addToAudience` flag to your template as below. This will create a contact in Loops using the `{{ .Email }}` value.
```json theme={"dark"}
{
"transactionalId": "clvmzp39u035tl50pw7wrl0ri",
"email": "{{ .Email }}",
"addToAudience": true,
"dataVariables": {
"confirmationUrl": "{{ .ConfirmationURL }}"
}
}
```
Here's how the template looks in the Supabase editor:
 With the integration now all set up, your Supabase authentication emails will be sent via Loops, giving you more visibility on your email sends and the great addition of being able to build beautiful and easy-to-update emails in the Loops editor.
To view all sends of your transactional emails, click through to the email
from the [Transactional](https://app.loops.so/transactional) page in Loops,
where you'll find the Metrics page containing a table showing all sends and
some statistics.
## Testing the integration
You can test your Loops integration by creating new users from [Authentication -> Users](https://supabase.com/dashboard/project/_/auth/users) page in Supabase.
Click **Add user** and select **Create new user**. Use an email address you have access to.
Then click on the new user in the list and click the **Send magic link** button. This will send the magic link email you set up in Supabase via Loops SMTP.
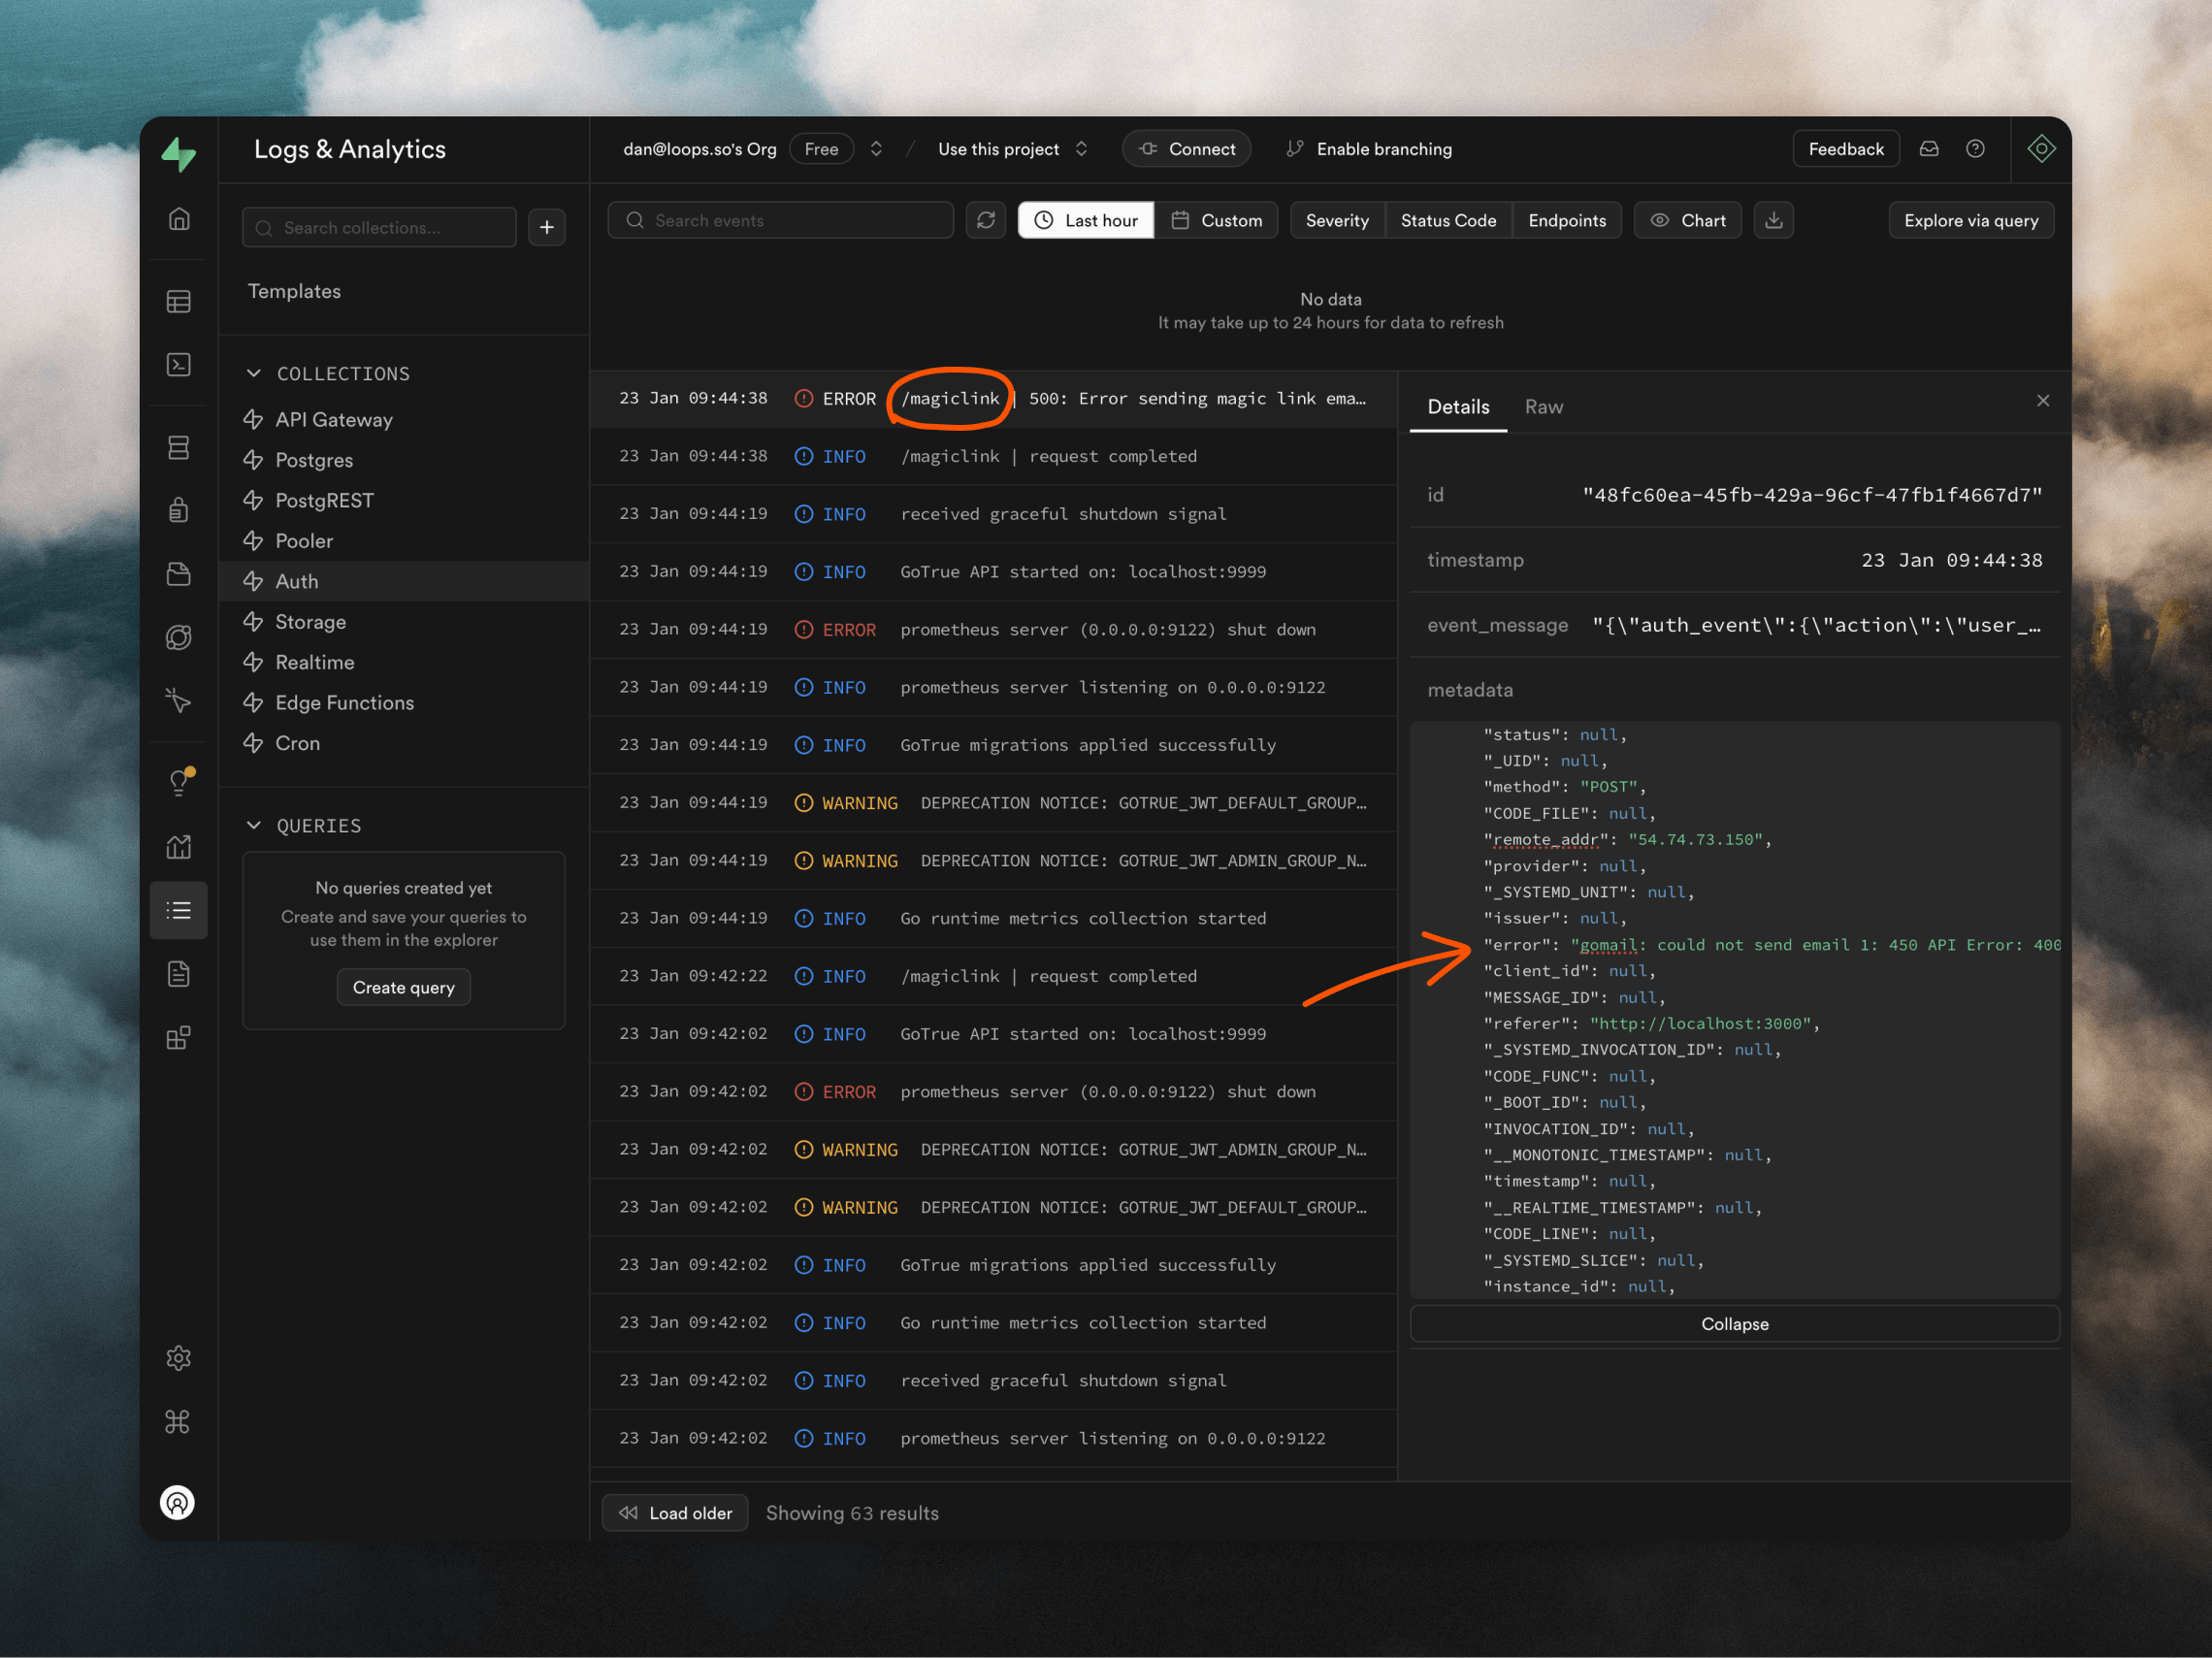
## Debugging
Supabase offers a detailed view of authentication logs where you can look for issues with your Loops integration.
Go to [Logs -> Auth](https://supabase.com/dashboard/project/_/logs/auth-logs). To narrow down your search you can look for logs like "magiclink" or "invite".
With the integration now all set up, your Supabase authentication emails will be sent via Loops, giving you more visibility on your email sends and the great addition of being able to build beautiful and easy-to-update emails in the Loops editor.
To view all sends of your transactional emails, click through to the email
from the [Transactional](https://app.loops.so/transactional) page in Loops,
where you'll find the Metrics page containing a table showing all sends and
some statistics.
## Testing the integration
You can test your Loops integration by creating new users from [Authentication -> Users](https://supabase.com/dashboard/project/_/auth/users) page in Supabase.
Click **Add user** and select **Create new user**. Use an email address you have access to.
Then click on the new user in the list and click the **Send magic link** button. This will send the magic link email you set up in Supabase via Loops SMTP.
## Debugging
Supabase offers a detailed view of authentication logs where you can look for issues with your Loops integration.
Go to [Logs -> Auth](https://supabase.com/dashboard/project/_/logs/auth-logs). To narrow down your search you can look for logs like "magiclink" or "invite".
 ## Important notes
* You need to add a template in Loops and set up the email in Supabase for at least the **Confirm signup** and **Magic Link** templates.
* The subject in Supabase templates is always overwritten by the subject added to the corresponding template in Loops.
* The sender name and sender email configured in your Supabase SMTP settings are always overwritten by the sender details added to your templates in Loops.
* Any Supabase email not set up with the correct API-like payload will fail to send.
## Important notes
* You need to add a template in Loops and set up the email in Supabase for at least the **Confirm signup** and **Magic Link** templates.
* The subject in Supabase templates is always overwritten by the subject added to the corresponding template in Loops.
* The sender name and sender email configured in your Supabase SMTP settings are always overwritten by the sender details added to your templates in Loops.
* Any Supabase email not set up with the correct API-like payload will fail to send.