> ## Documentation Index
> Fetch the complete documentation index at: https://loops.so/docs/llms.txt
> Use this file to discover all available pages before exploring further.
# Bubble integration
> Connect Bubble to Loops with our plugin to add contacts, trigger workflows, and send transactional email.
The Loops Bubble integration connects your Bubble app to Loops so you can sync contacts, trigger workflows, and send transactional email. For other Loops integrations, see the [integrations overview](/integrations).
Our Bubble plugin lets you:
* Add, find, update and delete contacts
* Send events to trigger workflows
* Send transactional email
Our Bubble plugin is unfortunately limited to what it can do because of how
Bubble works. If you want more flexibility, such as syncing more contact
data to Loops, check out our [tutorial for using Bubble's API
Connector](/guides/bubble-api-connector).
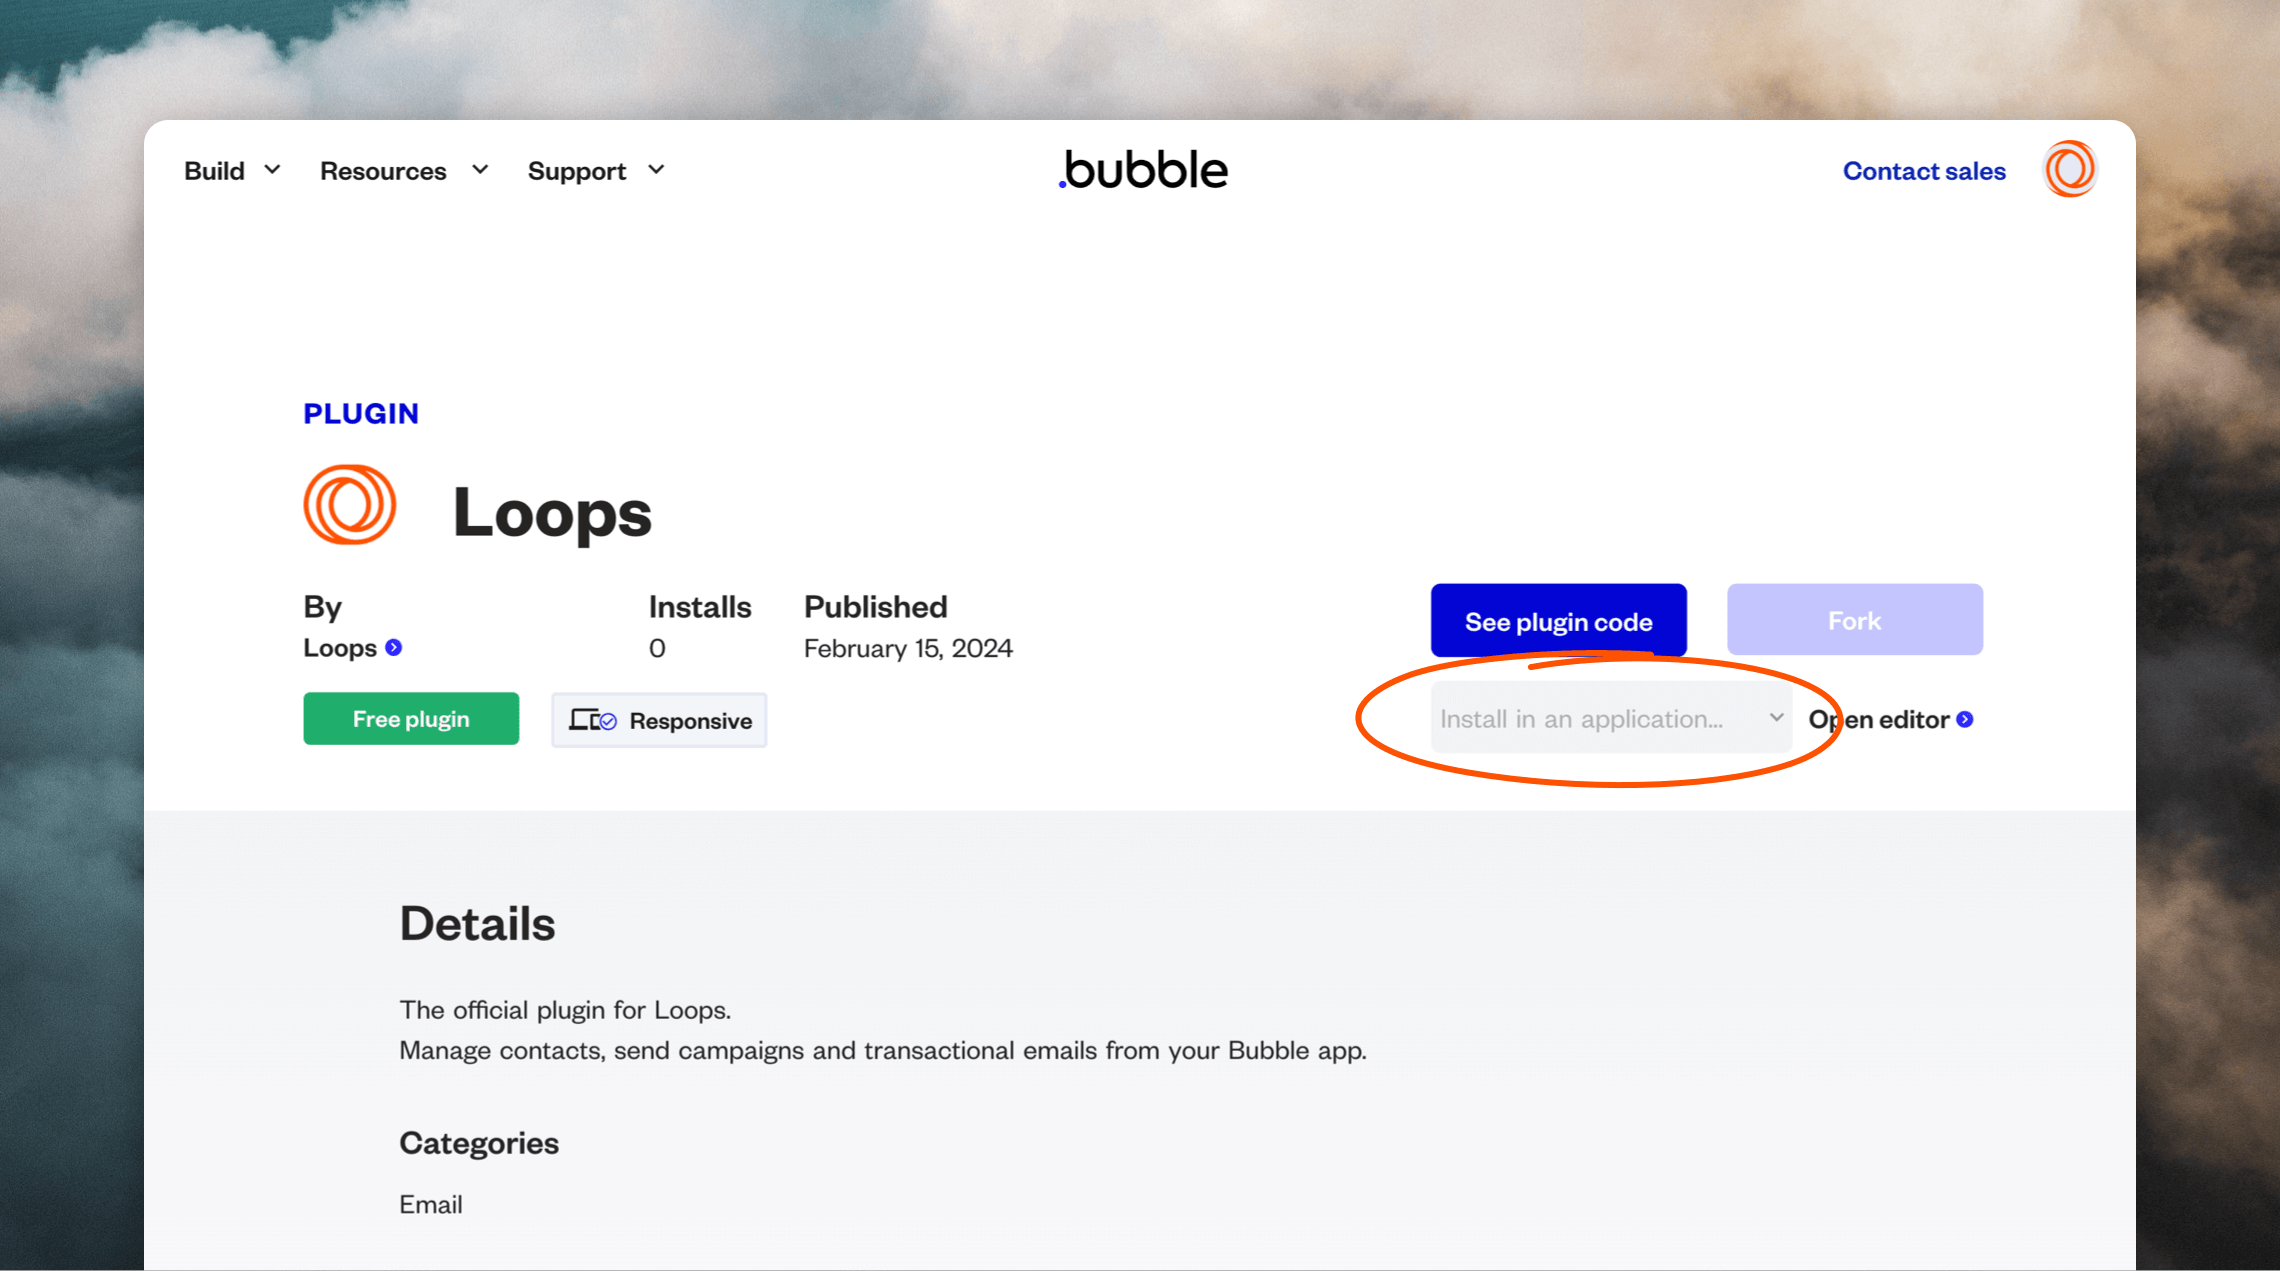
## Install the plugin
Go to the [Loops plugin](https://bubble.io/plugin/loops-1704117562175x705056703666192400) and select your app from the "Install in an application..." dropdown.
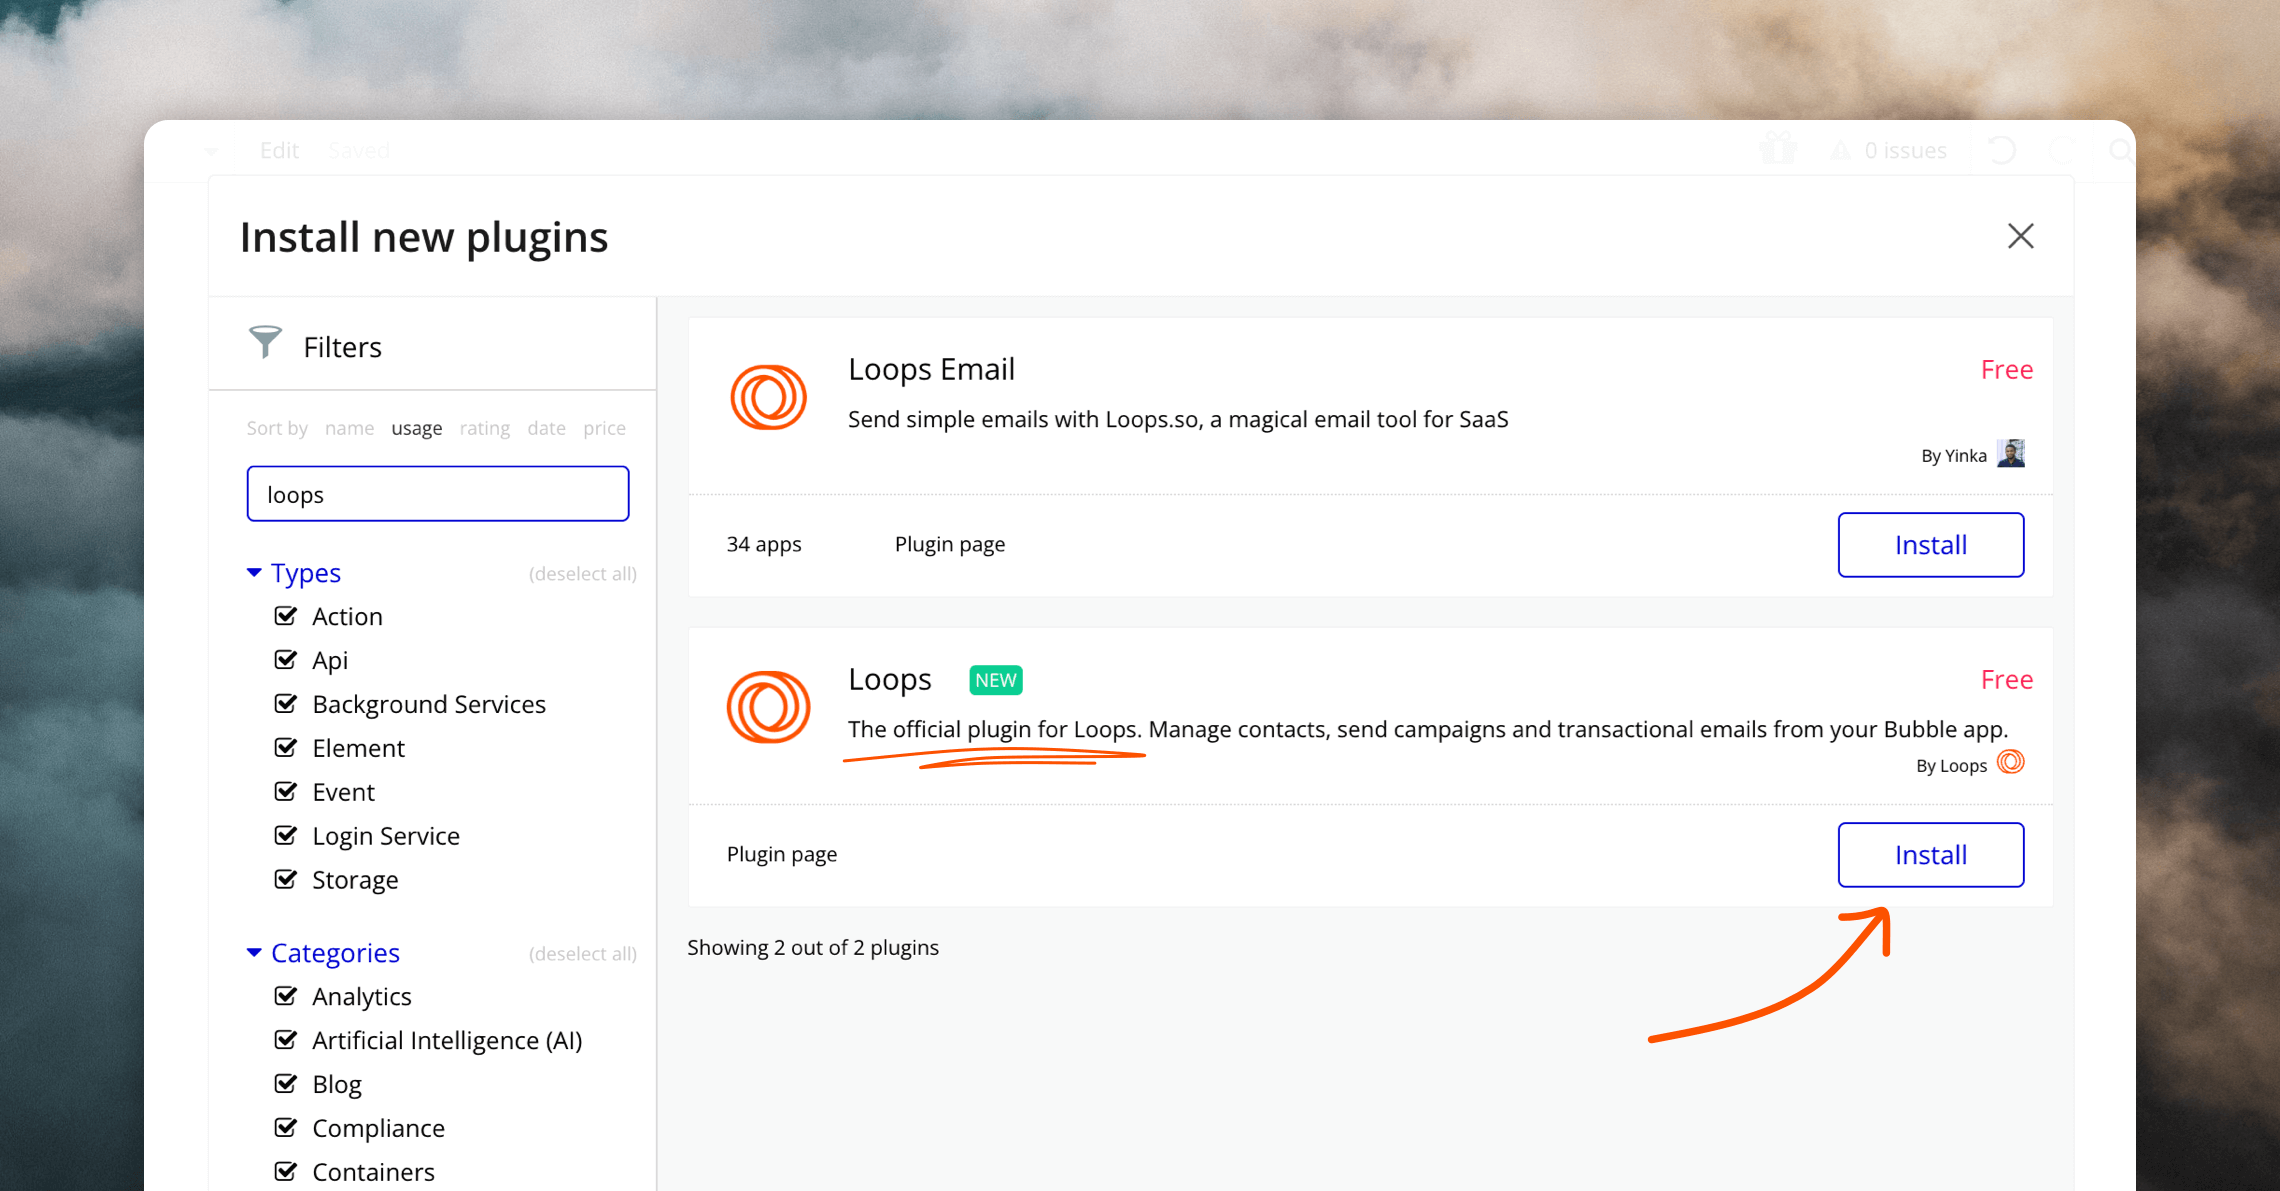
 Alternatively, go to the Plugins page in your Bubble admin, click "Add plugins" in the top right, and search for "Loops".
 ## Set up the plugin
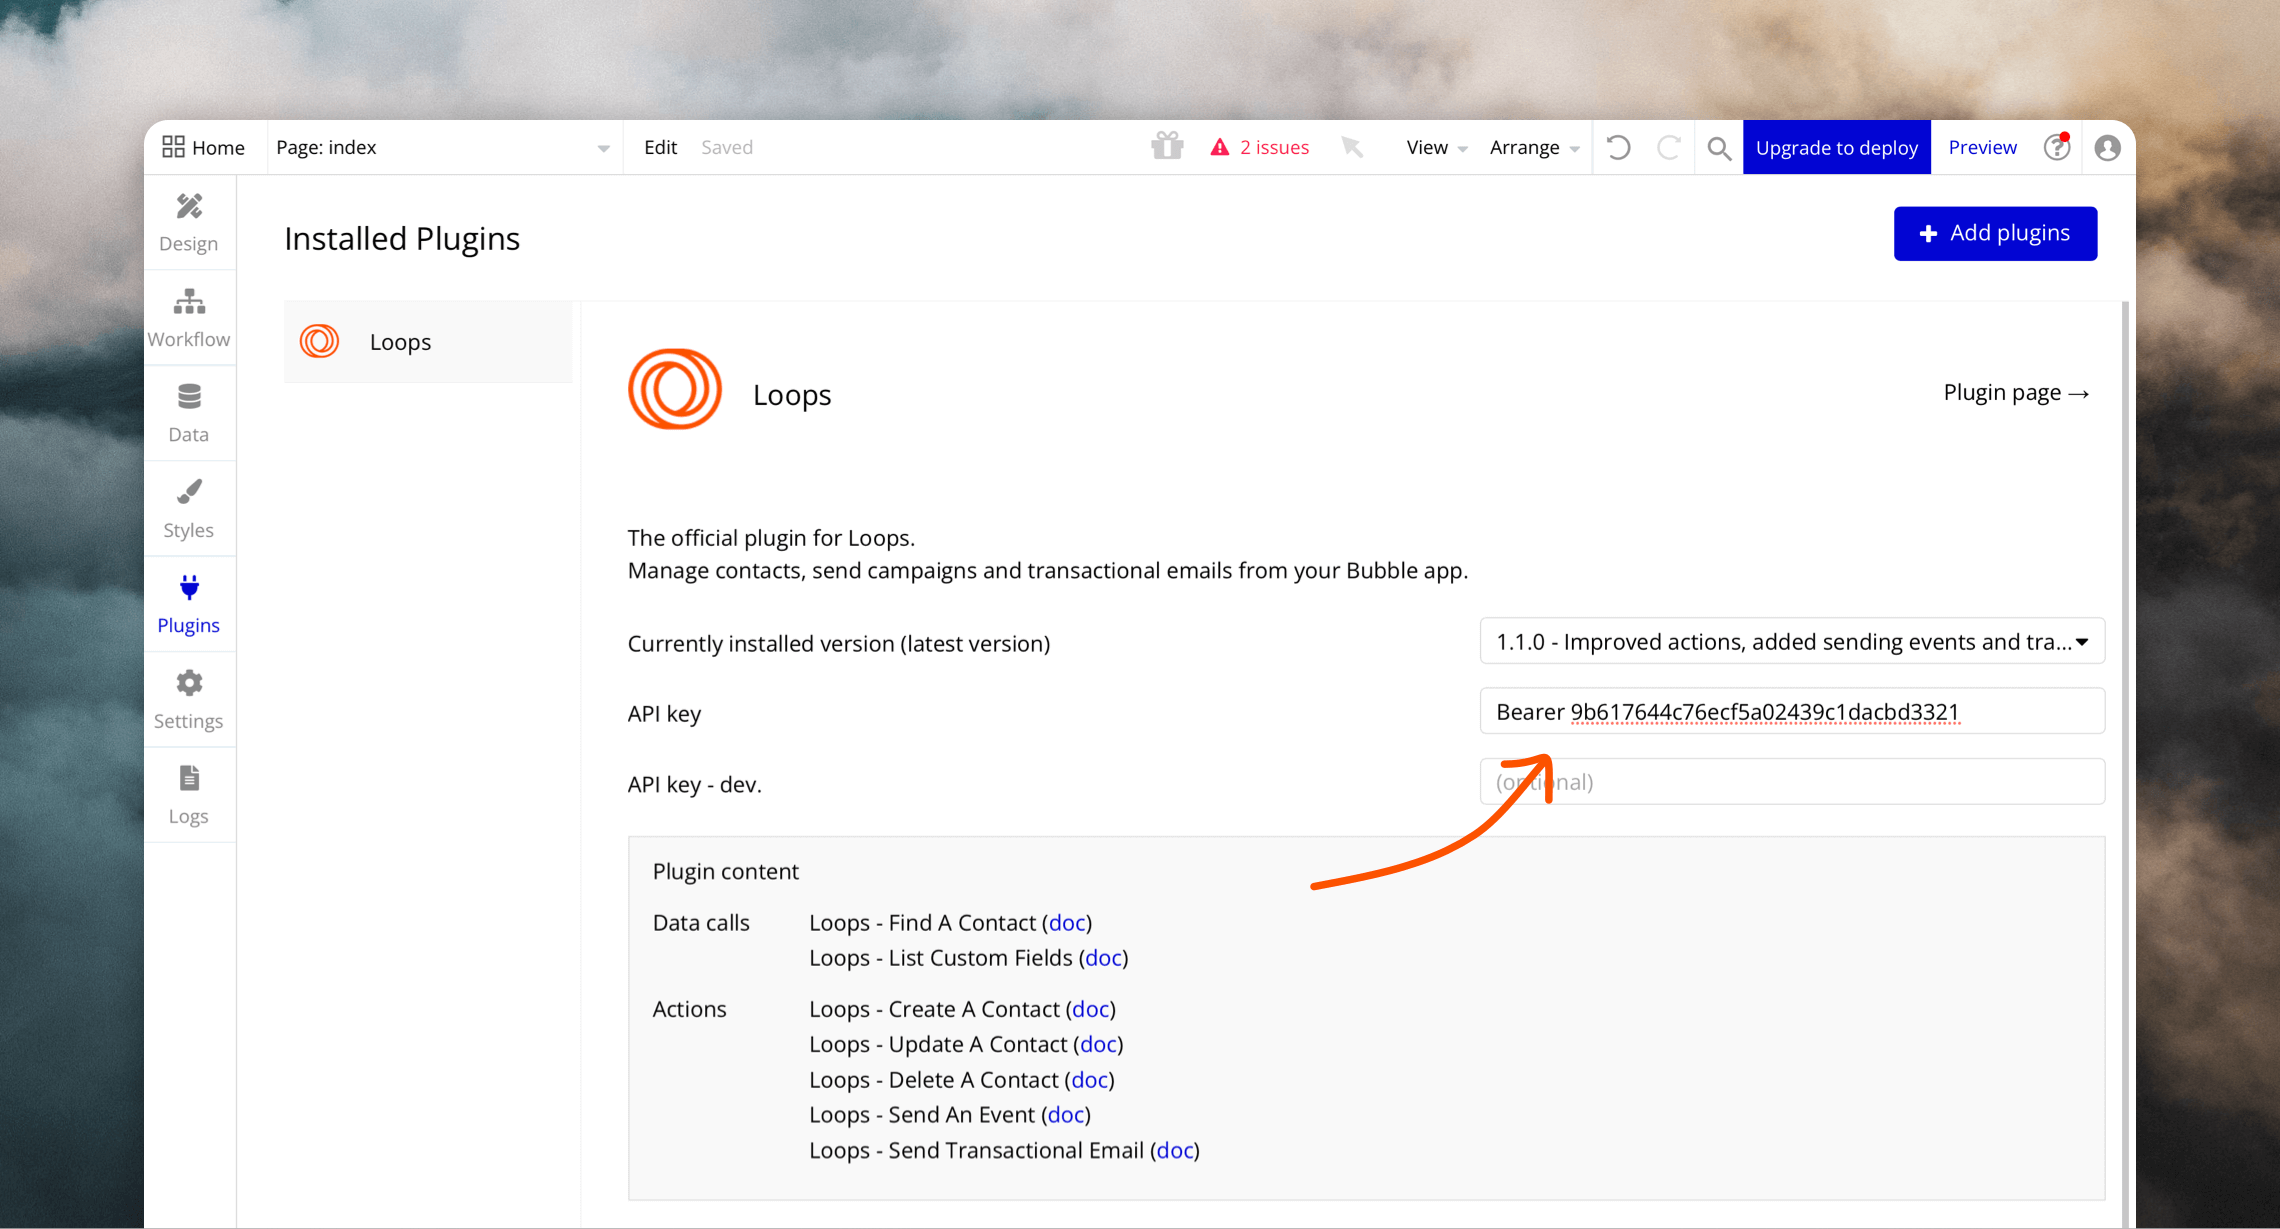
To use the plugin you will need to add a Loops API key into Bubble.
First, go to your [Loops API settings page](https://app.loops.so/settings?page=api) and copy an API key. You may need to create a key first.
Then go to the Plugins page in Bubble, select the Loops plugin and paste your API key into the "API key" field, prepended with the word "Bearer" and a space.
## Set up the plugin
To use the plugin you will need to add a Loops API key into Bubble.
First, go to your [Loops API settings page](https://app.loops.so/settings?page=api) and copy an API key. You may need to create a key first.
Then go to the Plugins page in Bubble, select the Loops plugin and paste your API key into the "API key" field, prepended with the word "Bearer" and a space.
 ## Using the plugin actions
To use the plugin actions in a workflow, select "Plugins" in the menu and you will see the options show up (prefaced with "Loops - ").
## Using the plugin actions
To use the plugin actions in a workflow, select "Plugins" in the menu and you will see the options show up (prefaced with "Loops - ").
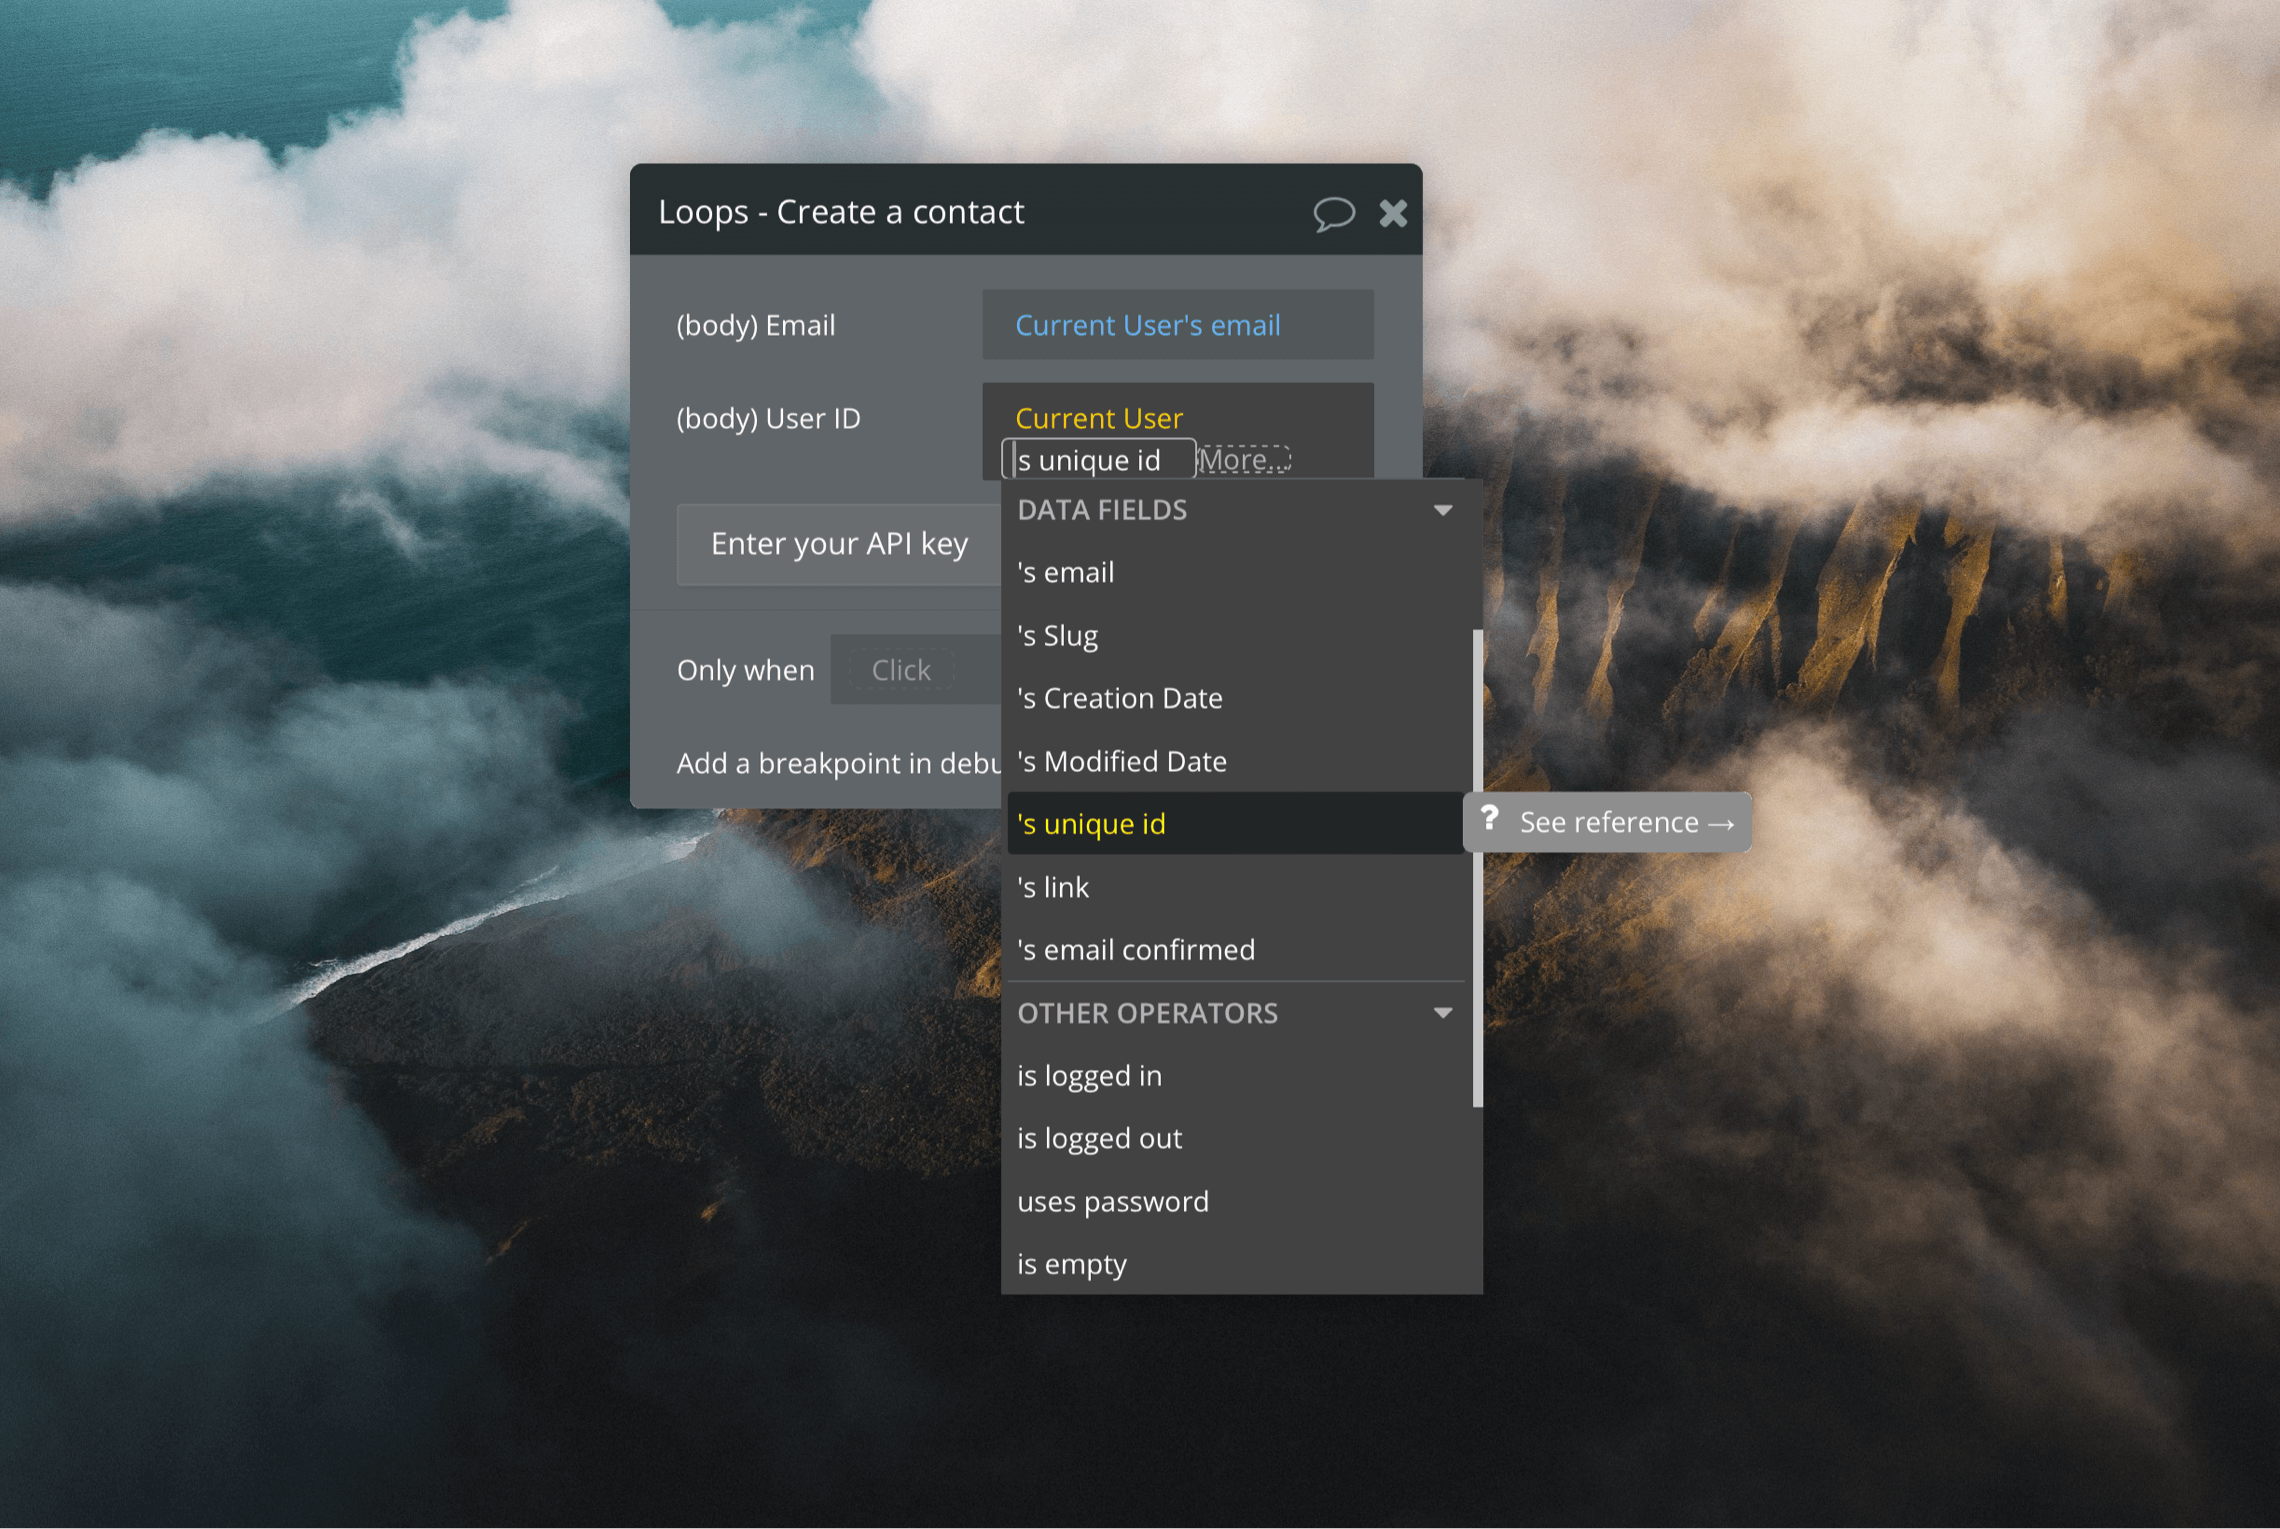
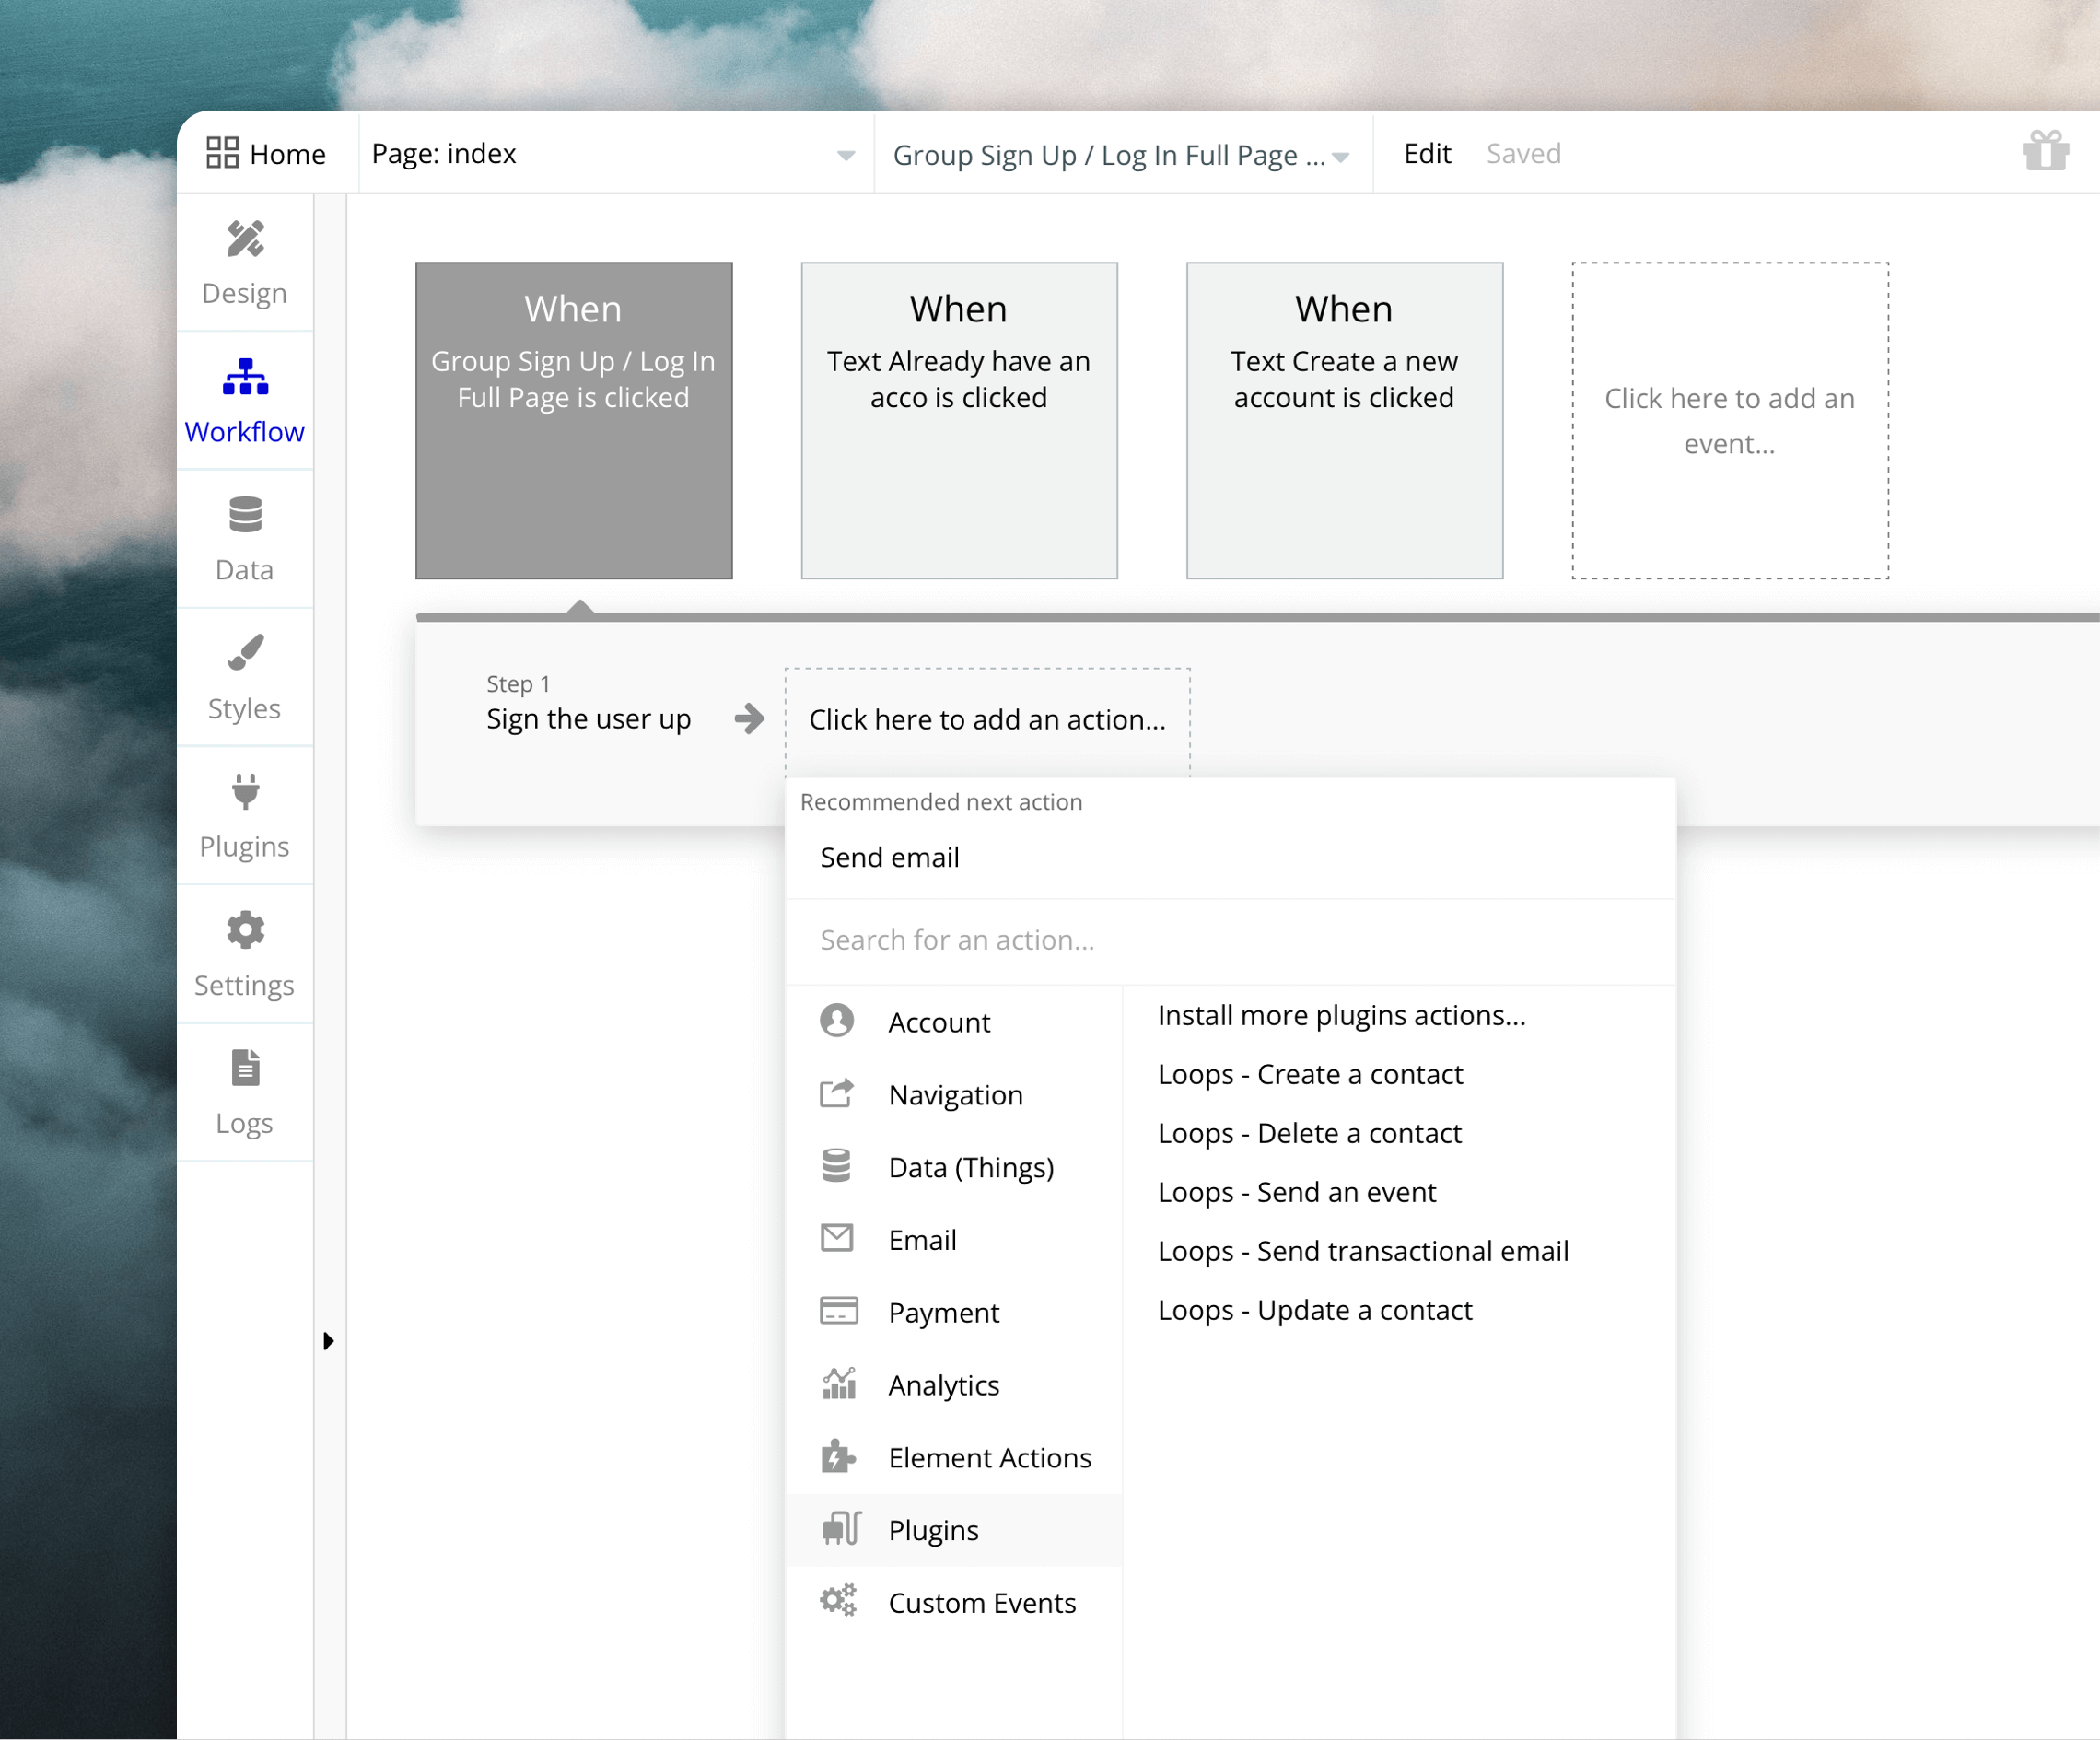 Here's a simple example of using the Bubble plugin to add all new users to your Loops audience.
After your sign up action, add a new "Loops - Create a contact" action.
In the form, add your user email into the "Email" field and user ID into the "User ID" field.
Here's a simple example of using the Bubble plugin to add all new users to your Loops audience.
After your sign up action, add a new "Loops - Create a contact" action.
In the form, add your user email into the "Email" field and user ID into the "User ID" field.
 And that's it!
## Actions
The plugin contains actions that replicate what's possible with the [Loops API](/api-reference/intro).
### Create a contact
The **Create a contact** action will create new contacts in Loops using the email address and user ID that you send from Bubble.
If you want to "create or update" users, use the [Update a contact](#update-a-contact) action instead.
You need to provide both email and user ID values, otherwise the underlying API request from Bubble will fail.
The **Create a contact with name** action lets you also send a first and last name to Loops.
[API documentation](/api-reference/create-contact)
### Find a contact
The **Find contact by email** action will find a Loops contact based on the provided email address. This can be used to see if one of your user already exists in your Loops audience.
Similarly the **Find contact by user ID** action will find a contact by their ID.
[API documentation](/api-reference/find-contact)
### Update a contact
This action will update the email address of a Loops contact who has the provided user ID.
This action can also be used to "update or create" contacts. If a contact doesn't already exist with the provided email or user ID, a contact will be created.
The **Update a contact with name** action lets you also send a first and last name to Loops.
[API documentation](/api-reference/update-contact)
### Delete a contact
The actions **Delete a contact by email** and **Delete a contact by user ID** will delete a contact from Loops.
This is useful for when a user closes their account in your application and therefore you no longer want to email them from Loops.
[API documentation](/api-reference/delete-contact)
### Send an event
The send event actions can be used to [trigger workflows](/workflows) from your application. For example, you may have a welcome workflow which sends an email drip campaign to new users.
For the Send an event action, you need to provide an "Event name" value and the user's ID or email address.
[API documentation](/api-reference/send-event)
### Send transactional email
Transactional emails are one-time emails like password resets sent by apps to users based on an action.
To send transactional emails, you will first need to [create the email in Loops](/transactional#compose-your-email).
Once you have written the email and added data variables, you can click **Next** to see the example payload for the API.
Note the names of the `dataVariables` (which you added in the email) because you need these in Bubble.
And that's it!
## Actions
The plugin contains actions that replicate what's possible with the [Loops API](/api-reference/intro).
### Create a contact
The **Create a contact** action will create new contacts in Loops using the email address and user ID that you send from Bubble.
If you want to "create or update" users, use the [Update a contact](#update-a-contact) action instead.
You need to provide both email and user ID values, otherwise the underlying API request from Bubble will fail.
The **Create a contact with name** action lets you also send a first and last name to Loops.
[API documentation](/api-reference/create-contact)
### Find a contact
The **Find contact by email** action will find a Loops contact based on the provided email address. This can be used to see if one of your user already exists in your Loops audience.
Similarly the **Find contact by user ID** action will find a contact by their ID.
[API documentation](/api-reference/find-contact)
### Update a contact
This action will update the email address of a Loops contact who has the provided user ID.
This action can also be used to "update or create" contacts. If a contact doesn't already exist with the provided email or user ID, a contact will be created.
The **Update a contact with name** action lets you also send a first and last name to Loops.
[API documentation](/api-reference/update-contact)
### Delete a contact
The actions **Delete a contact by email** and **Delete a contact by user ID** will delete a contact from Loops.
This is useful for when a user closes their account in your application and therefore you no longer want to email them from Loops.
[API documentation](/api-reference/delete-contact)
### Send an event
The send event actions can be used to [trigger workflows](/workflows) from your application. For example, you may have a welcome workflow which sends an email drip campaign to new users.
For the Send an event action, you need to provide an "Event name" value and the user's ID or email address.
[API documentation](/api-reference/send-event)
### Send transactional email
Transactional emails are one-time emails like password resets sent by apps to users based on an action.
To send transactional emails, you will first need to [create the email in Loops](/transactional#compose-your-email).
Once you have written the email and added data variables, you can click **Next** to see the example payload for the API.
Note the names of the `dataVariables` (which you added in the email) because you need these in Bubble.
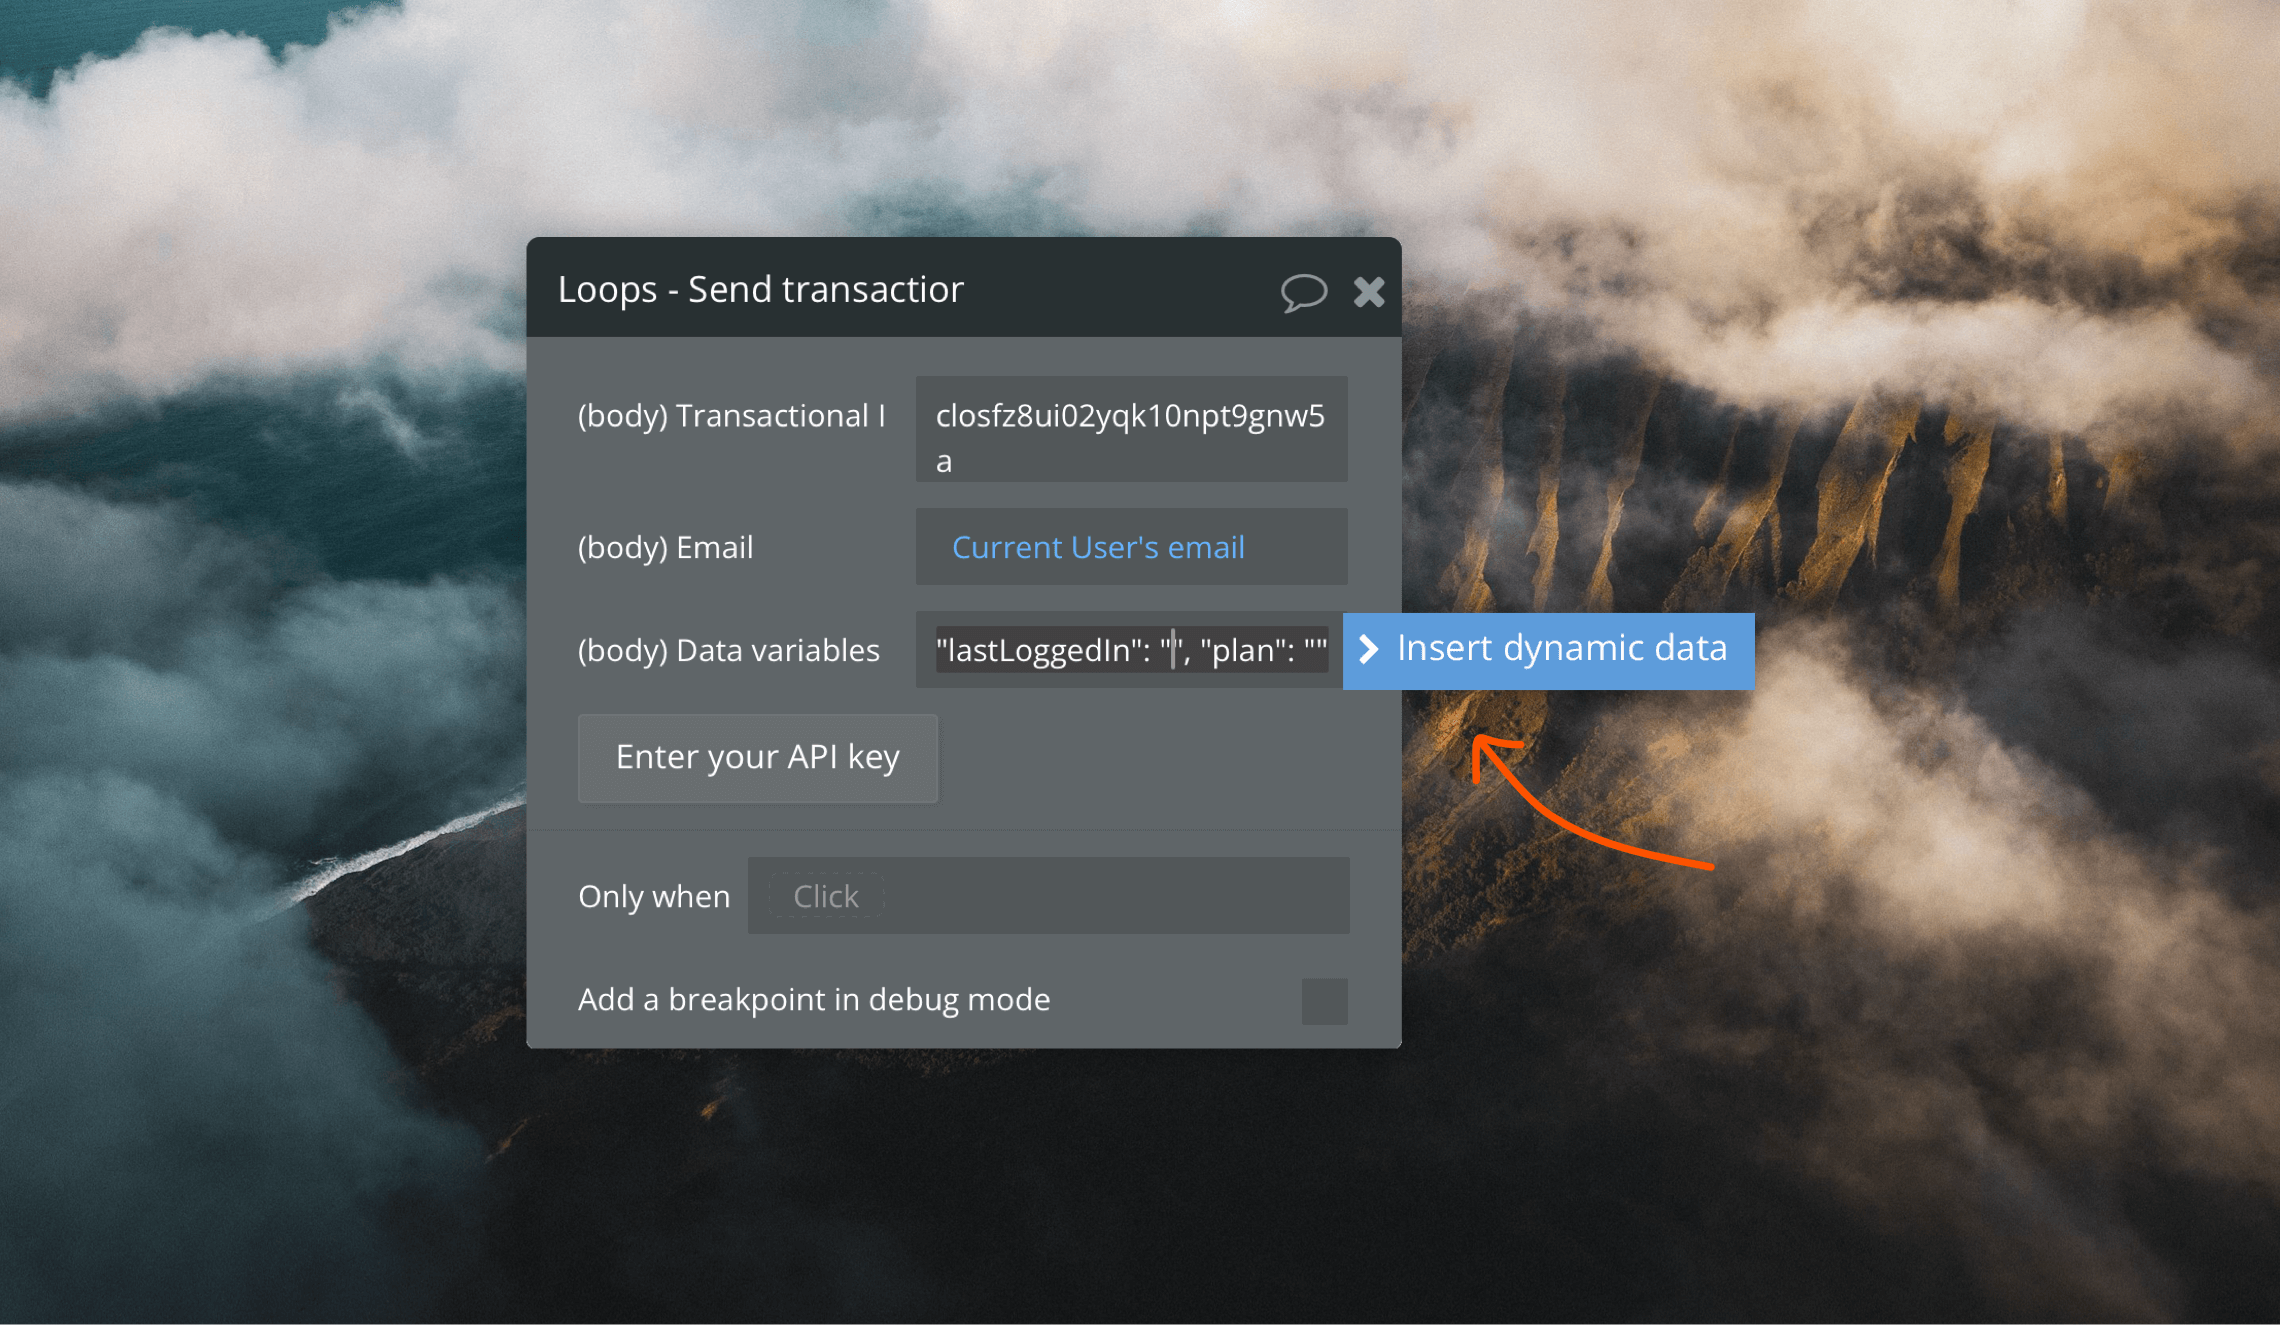 Once you create the action in Bubble, you will see the three fields in the form.
Here is an example API payload for the Loops API:
```json theme={"dark"}
{
"transactionalId": "clomzp89u635xl30px7wrl0ri",
"email": "test@example.com",
"dataVariables": {
"lastLoggedIn": "20240214T10:01:29Z",
"plan": "Pro"
}
}
```
To get the same effect in Bubble, we need to enter the following into the "Data variables" field:
`"lastLoggedIn": "20240214T10:01:29Z", "plan": "Pro"`
To add user data into this field, place your cursor and select **Insert dynamic data** (see image above).
[API documentation](/api-reference/send-transactional-email)
Once you create the action in Bubble, you will see the three fields in the form.
Here is an example API payload for the Loops API:
```json theme={"dark"}
{
"transactionalId": "clomzp89u635xl30px7wrl0ri",
"email": "test@example.com",
"dataVariables": {
"lastLoggedIn": "20240214T10:01:29Z",
"plan": "Pro"
}
}
```
To get the same effect in Bubble, we need to enter the following into the "Data variables" field:
`"lastLoggedIn": "20240214T10:01:29Z", "plan": "Pro"`
To add user data into this field, place your cursor and select **Insert dynamic data** (see image above).
[API documentation](/api-reference/send-transactional-email)