> ## Documentation Index
> Fetch the complete documentation index at: https://loops.so/docs/llms.txt
> Use this file to discover all available pages before exploring further.
# Auth0 integration
> Send Auth0 authentication emails with Loops.
Set up an SMTP connection to send all of your Auth0 emails with Loops.
There are two big benefits to using Loops for sending your Auth0 emails:
You can use [Loops' design editor](/creating-emails/editor) to create (and
then easily edit) beautiful transactional emails instead of having to code
them with HTML.
You get full visibility on which emails are being sent, when, and to whom in
your Loops account. Auth0 doesn't offer this view.
## Set up Loops SMTP in Auth0
Go to **Branding -> Email Provider** in your Auth0 dashboard.
Scroll down and click on **SMTP Provider**.
In the SMTP Provider Settings section below, enter a value into the "From" field. This value will *always be overwritten by the values set in your Loops templates* from the next step, so it can be anything.
In the **SMTP Provider Settings** section enter the following data:
| Field | Value |
| ----------- | ------------------------------------------------------------------------------------------- |
| Host | `smtp.loops.so` |
| Port number | `587` |
| Username | `loops` |
| Password | An API key copied from your [API settings](https://app.loops.so/settings?page=api) in Loops |
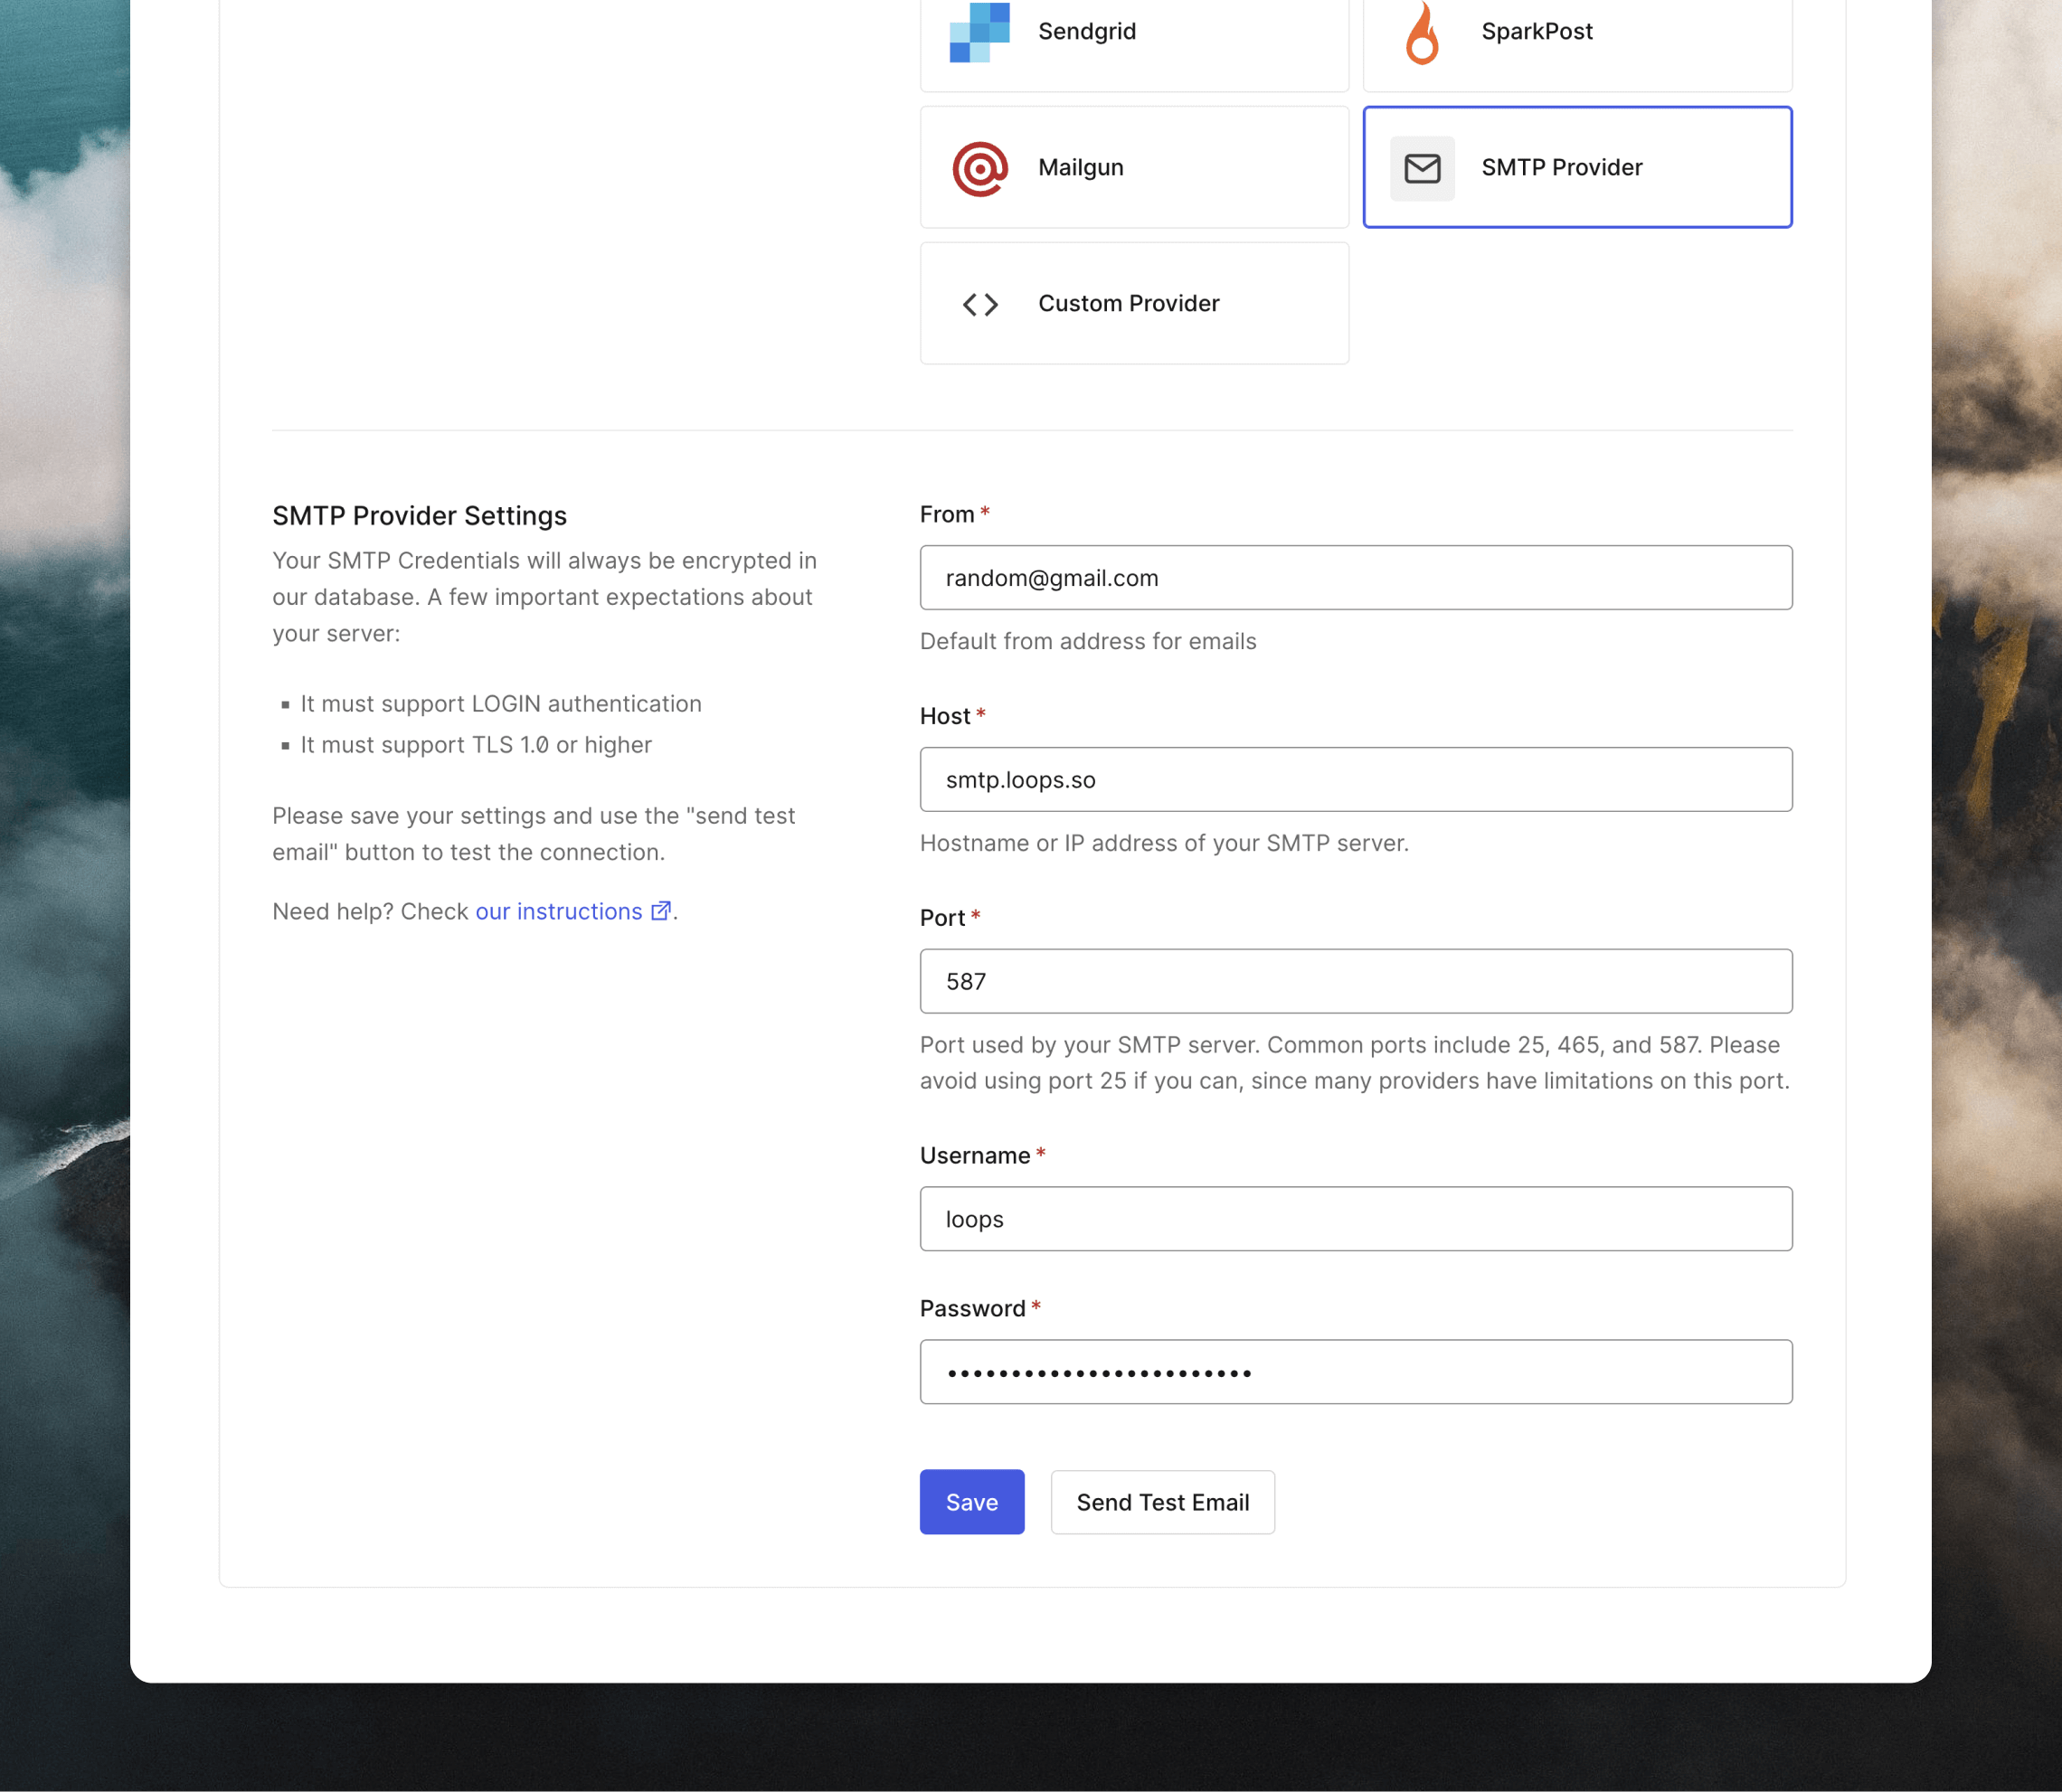 The **Send Test Email** button here will not work due to how the Loops SMTP
system works. You can test your connection in a later step.
## Create Transactional emails in Loops
Next, create new transactional emails for the emails you are sending from Auth0. Go to **Branding -> Email Templates** to view the full list.
In Loops, go to the [Transactional page](https://app.loops.so/transactional) and click **New**. Alternatively, you can select one of our many ready-made templates from the [Templates page](https://app.loops.so/templates).
The **Send Test Email** button here will not work due to how the Loops SMTP
system works. You can test your connection in a later step.
## Create Transactional emails in Loops
Next, create new transactional emails for the emails you are sending from Auth0. Go to **Branding -> Email Templates** to view the full list.
In Loops, go to the [Transactional page](https://app.loops.so/transactional) and click **New**. Alternatively, you can select one of our many ready-made templates from the [Templates page](https://app.loops.so/templates).
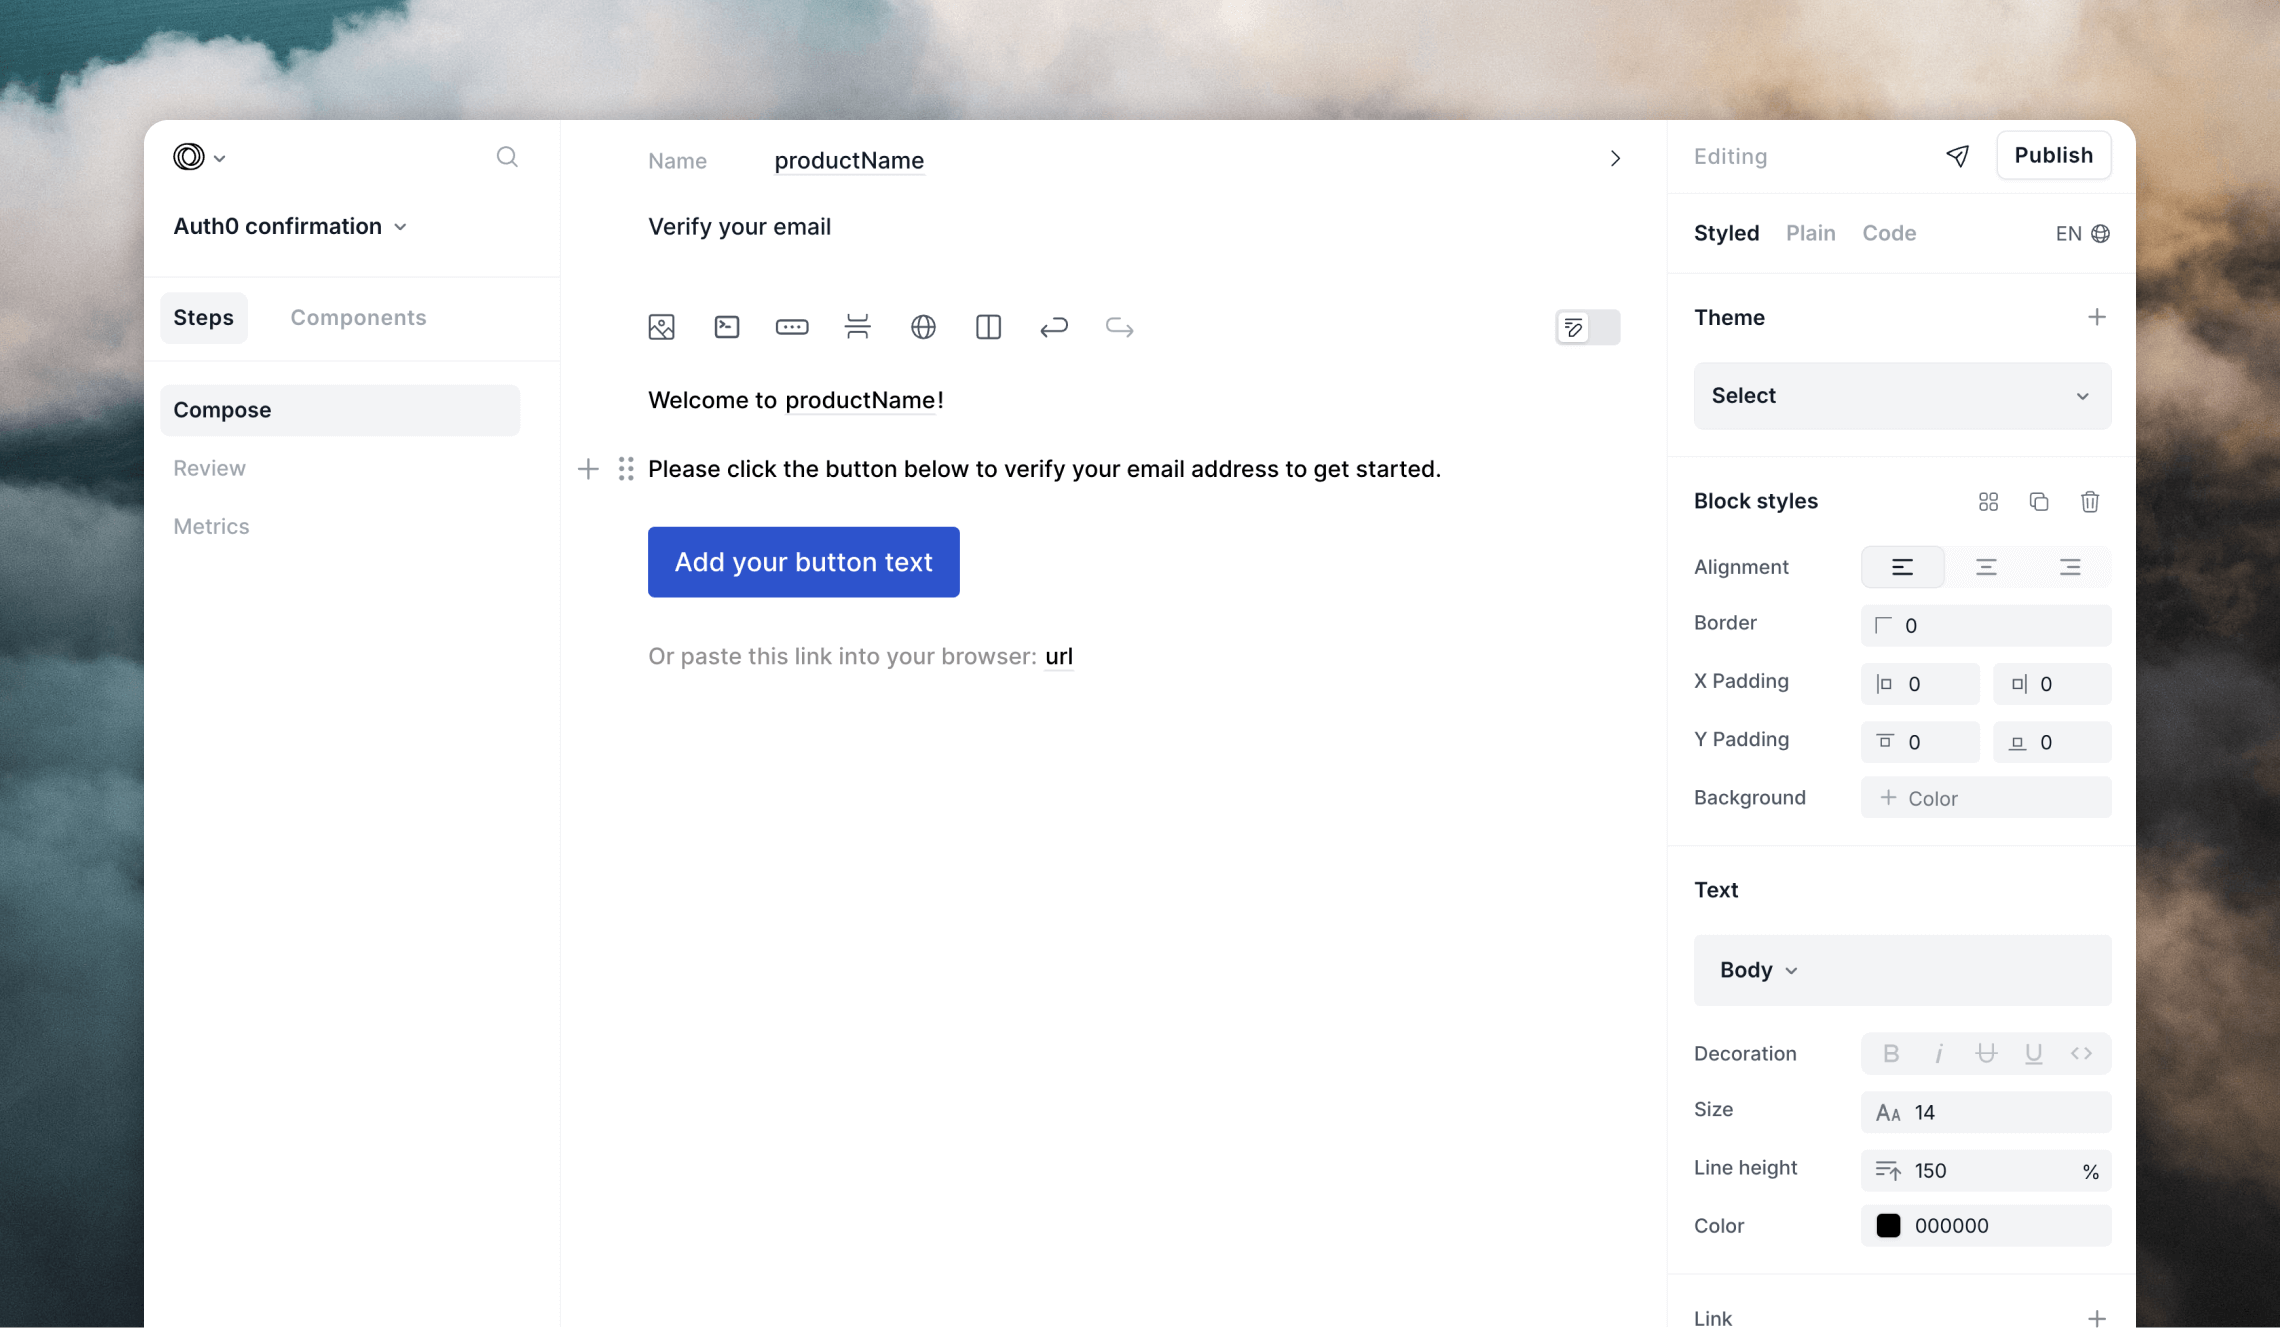 You can then use [the Loops editor](/creating-emails/editor) to create nicely-designed templates or make them as simple as you like.
You can even create [themes](/creating-emails/styles#themes) to apply consistent design and branding to all of your emails.
For each Loops template you create, you need to [add data variables](/creating-emails/personalizing-emails#add-dynamic-content-to-emails), which allow data from Auth0 to be inserted into each email.
You can check the list of [Common variables](https://auth0.com/docs/customize/email/email-templates#common-variables) supported in each email from the Auth0 documentation.
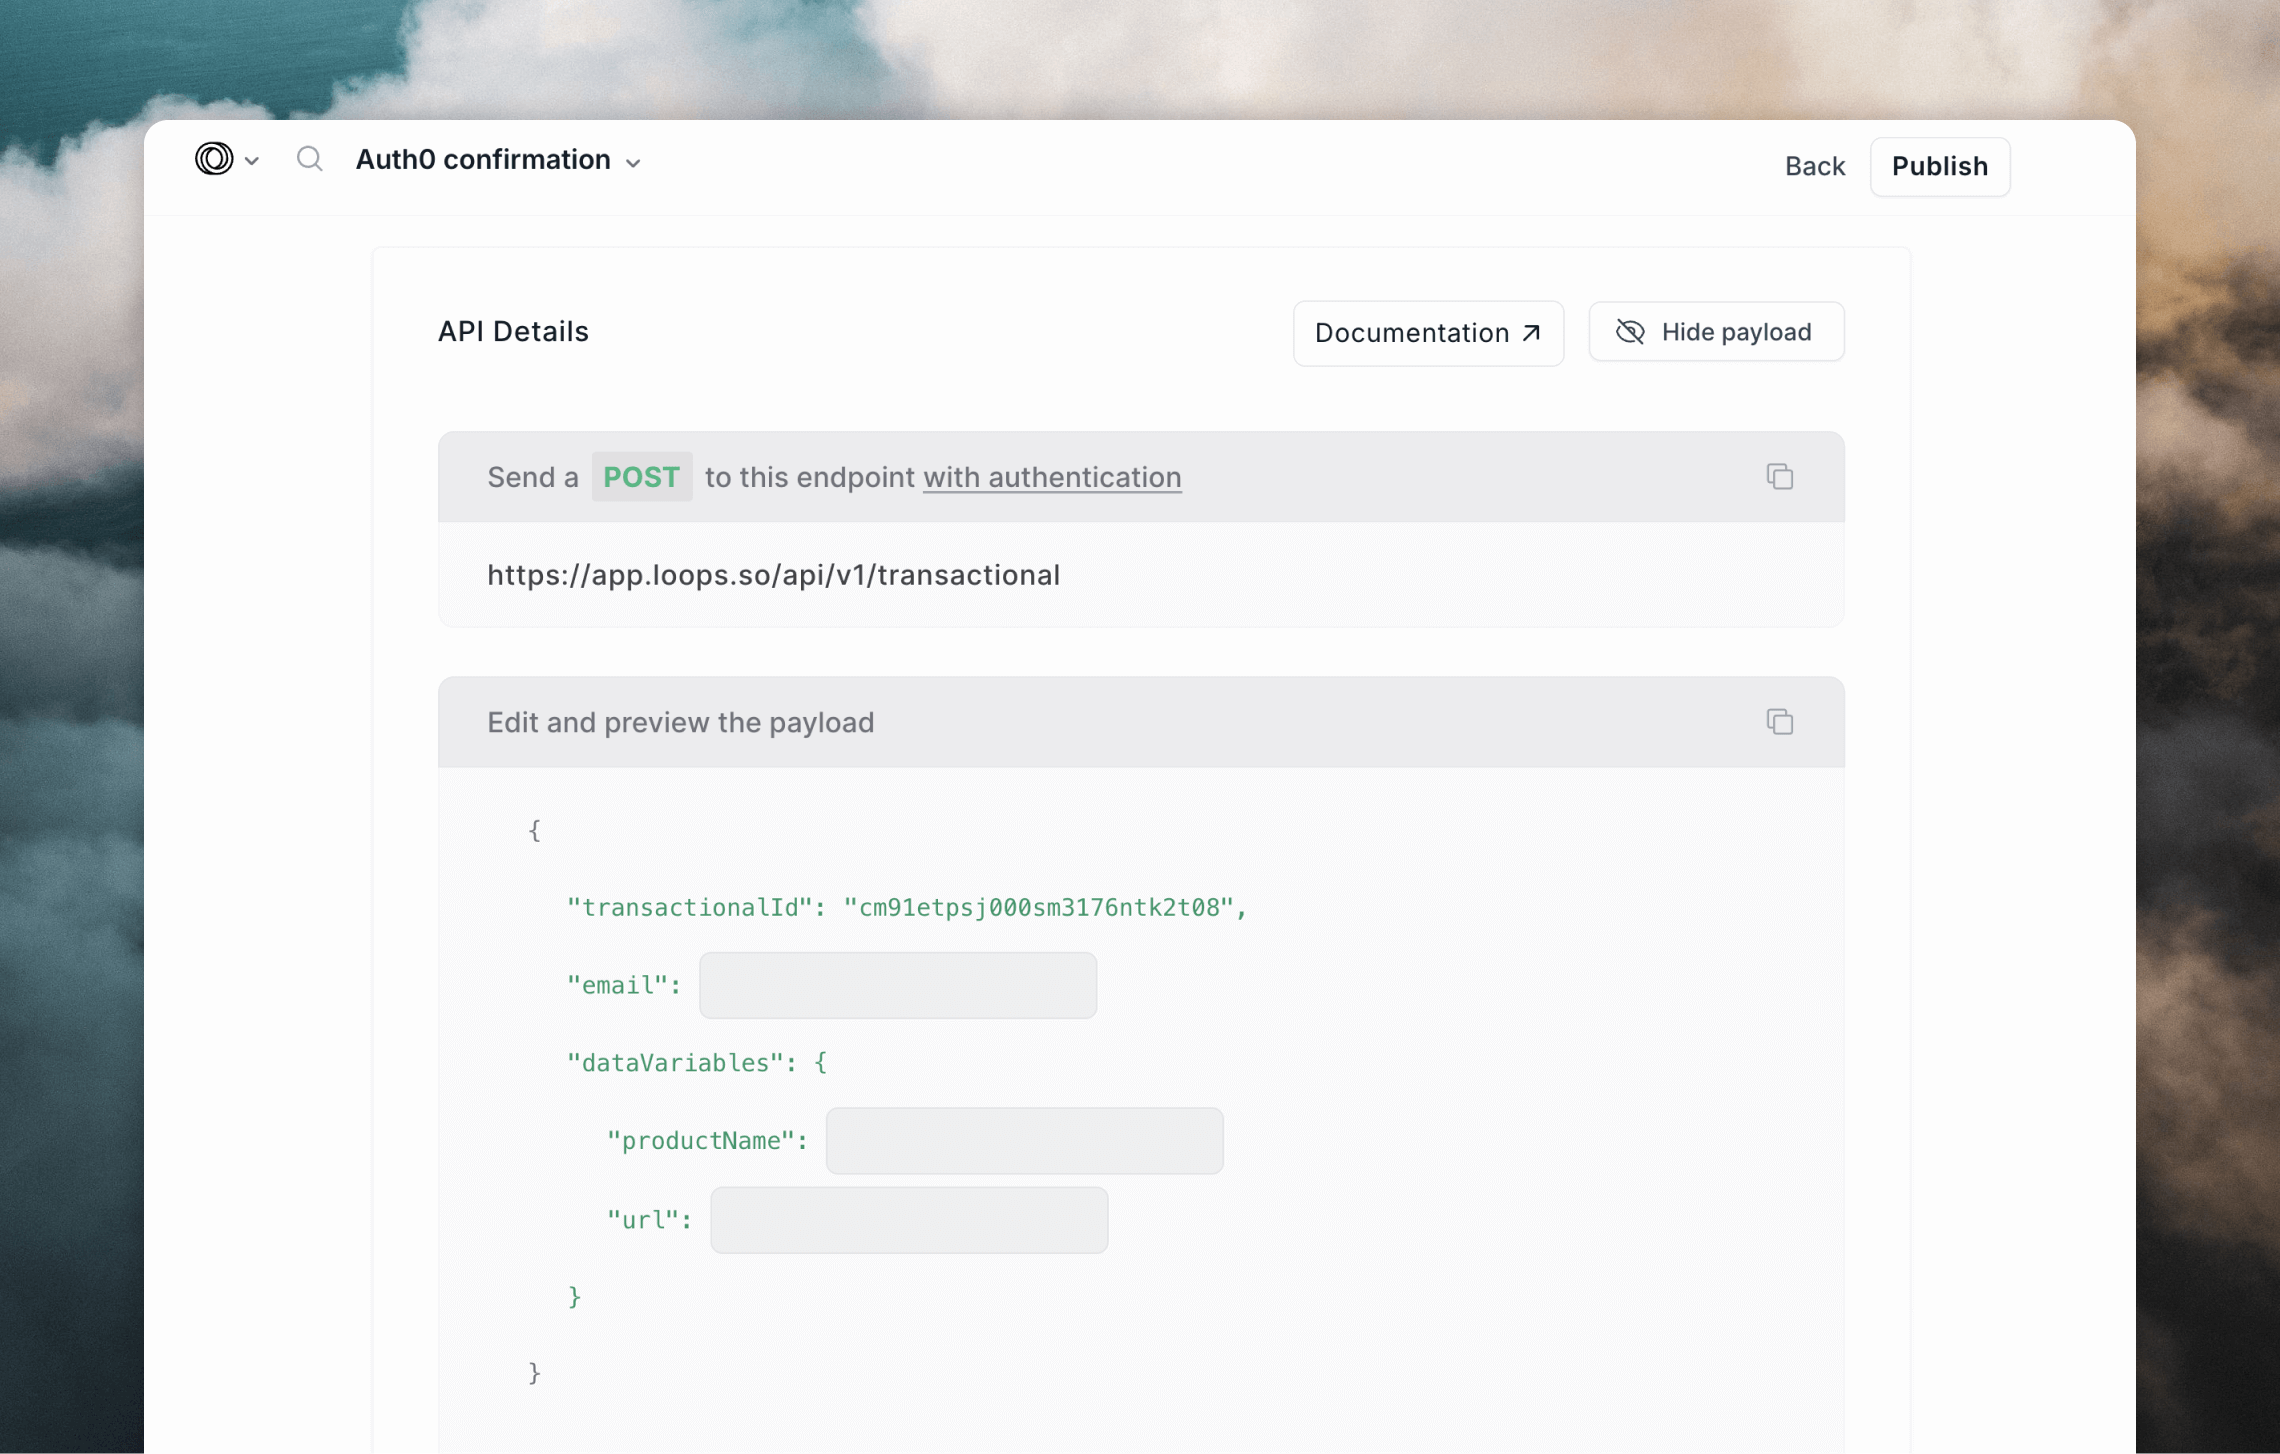
Once you're done creating the email and adding the data variables, click **Next**. On the next page, click the **Show payload** button to view the API payload for your template. You will need this for the next step.
You can then use [the Loops editor](/creating-emails/editor) to create nicely-designed templates or make them as simple as you like.
You can even create [themes](/creating-emails/styles#themes) to apply consistent design and branding to all of your emails.
For each Loops template you create, you need to [add data variables](/creating-emails/personalizing-emails#add-dynamic-content-to-emails), which allow data from Auth0 to be inserted into each email.
You can check the list of [Common variables](https://auth0.com/docs/customize/email/email-templates#common-variables) supported in each email from the Auth0 documentation.
Once you're done creating the email and adding the data variables, click **Next**. On the next page, click the **Show payload** button to view the API payload for your template. You will need this for the next step.
 Make sure to also publish your email! It won't send unless it's published.
Read our detailed guide for sending transactional emails.
## Configure email templates in Auth0
The final step is to make sure your emails in Auth0 are configured to send the correct data to Loops.
Make sure you set up at least the **Verification Email (using Link)** or
**Verification Email (using code)** templates in Auth0. Enable other emails
based on your user flows.
Loops SMTP integrations work a bit differently than most. Instead of sending a text or HTML email body, you set them up to send API-like data.
In Auth0, go to **Branding -> Email Templates**, then edit each template to contain the payload as shown in the previous step (you can click the clipboard icon in Loops to copy the full payload).
Make sure that each template you want to use in Auth0 has the **Status** field
enabled.
If you are using Passwordless authentication, add your Loops payload into the **Body** field at **Authentication -> Passwordless -> Email**.
Once pasted into the **Message** body, you need to add the Auth0 message variables into the payload. You can do this using double curly brackets like `{{ url }}`.
Here is an example "Verification Email (using Link)" email template. This payload was copied from the template's Publish page in Loops, then the `{{ user.email }}` and `{{ url }}` Auth0 variables were added.
```json theme={"dark"}
{
"transactionalId": "clvmzp39u035tl50pw7wrl0ri",
"email": "{{ user.email }}",
"dataVariables": {
"productName": "{{ application.name }}",
"url": "{{ url }}"
}
}
```
If you want to add each Auth0 user to your Loops audience so you can send marketing email to them, add the `addToAudience` flag to your template as below. This will create a contact in Loops using the `{{ user.email }}` value.
```json {4} theme={"dark"}
{
"transactionalId": "clvmzp39u035tl50pw7wrl0ri",
"email": "{{ user.email }}",
"addToAudience": true,
"dataVariables": {
"productName": "{{ application.name }}",
"url": "{{ url }}"
}
}
```
Here's how the template looks in the Auth0 editor:
Make sure to also publish your email! It won't send unless it's published.
Read our detailed guide for sending transactional emails.
## Configure email templates in Auth0
The final step is to make sure your emails in Auth0 are configured to send the correct data to Loops.
Make sure you set up at least the **Verification Email (using Link)** or
**Verification Email (using code)** templates in Auth0. Enable other emails
based on your user flows.
Loops SMTP integrations work a bit differently than most. Instead of sending a text or HTML email body, you set them up to send API-like data.
In Auth0, go to **Branding -> Email Templates**, then edit each template to contain the payload as shown in the previous step (you can click the clipboard icon in Loops to copy the full payload).
Make sure that each template you want to use in Auth0 has the **Status** field
enabled.
If you are using Passwordless authentication, add your Loops payload into the **Body** field at **Authentication -> Passwordless -> Email**.
Once pasted into the **Message** body, you need to add the Auth0 message variables into the payload. You can do this using double curly brackets like `{{ url }}`.
Here is an example "Verification Email (using Link)" email template. This payload was copied from the template's Publish page in Loops, then the `{{ user.email }}` and `{{ url }}` Auth0 variables were added.
```json theme={"dark"}
{
"transactionalId": "clvmzp39u035tl50pw7wrl0ri",
"email": "{{ user.email }}",
"dataVariables": {
"productName": "{{ application.name }}",
"url": "{{ url }}"
}
}
```
If you want to add each Auth0 user to your Loops audience so you can send marketing email to them, add the `addToAudience` flag to your template as below. This will create a contact in Loops using the `{{ user.email }}` value.
```json {4} theme={"dark"}
{
"transactionalId": "clvmzp39u035tl50pw7wrl0ri",
"email": "{{ user.email }}",
"addToAudience": true,
"dataVariables": {
"productName": "{{ application.name }}",
"url": "{{ url }}"
}
}
```
Here's how the template looks in the Auth0 editor:
 To test that everything works, click the **Try** button beneath the editor. Insert your email address in the modal that appears, then click **Try** to send the email.
You will also be able to see activity for your email sends in **Monitoring -> Logs**.
The best way to view your Auth0 email history is in Loops. Go to your [Transactional](https://app.loops.so/transactional) page then click on one of your emails. Click on **Metrics** in the left menu to view a page containing a table showing all sends and some statistics.
## Important notes
* The subject in Auth0 templates is always overwritten by the subject added to the corresponding template in Loops.
* The sender email configured in your Auth0 SMTP settings is always overwritten by the "From" address added to your templates in Loops.
* Any enabled Auth0 template not set up with the correct API-like payload will fail to send.
To test that everything works, click the **Try** button beneath the editor. Insert your email address in the modal that appears, then click **Try** to send the email.
You will also be able to see activity for your email sends in **Monitoring -> Logs**.
The best way to view your Auth0 email history is in Loops. Go to your [Transactional](https://app.loops.so/transactional) page then click on one of your emails. Click on **Metrics** in the left menu to view a page containing a table showing all sends and some statistics.
## Important notes
* The subject in Auth0 templates is always overwritten by the subject added to the corresponding template in Loops.
* The sender email configured in your Auth0 SMTP settings is always overwritten by the "From" address added to your templates in Loops.
* Any enabled Auth0 template not set up with the correct API-like payload will fail to send.